Facebook, Redneck Trees, Creepy Garden Dwellers, Sewing, and Hygge…

and this is how the past week rolled here on the farm!

I had started week two of Facebook freedom, and it dawned on me that I did not have any way to contact a particular group of friends other than Facebook.

Sigh.

Feeling fairly defeated, I have logged back on. BUT, I have only been checking it twice a day. I think that is better than my former record 4,537 times a day and every time I went to the bathroom.

Do I still think it is possible for life without Facebook? ABSOLUTELY. I now realize that I didn’t have a good back-up plan for contacting folks (other than Facebook) which I have been working on correcting this week. I have only been looking at my group of friends page, and not my feed. Otherwise, I’d be back to spending a ludicrous amount of time on there.

Moving on!

I finally found a sign that I love after a four year search for the ‘perfect’ sign for my kitchen wall. It also helped that it was 50% off at Hobby Lobby! On the very same day, my food order with Mary Jane’s Farm  arrived. I can’t begin to tell you how excited I was. I have been an official “Farmgirl” with Mary Jane for five years, and following her site/magazine subscriber for eight. I had never tried her food before and I have no idea why I hadn’t before. I also had forgotten that as an official Farmgirl I get free shipping! Hello!

So, I got a sampler pack that lets you try the Budget mix (think: Bisquick on a heavenly, organic level) and then a couple of instant meals that you just add water to the bag! They are intended for on-the-go or for camping/backpacking. All I can say is: WOW. Simply…amazing. In fact, I have already restocked yet again. More on that later.

Here is my sign and some of the food items.

IMG_20171105_104856660

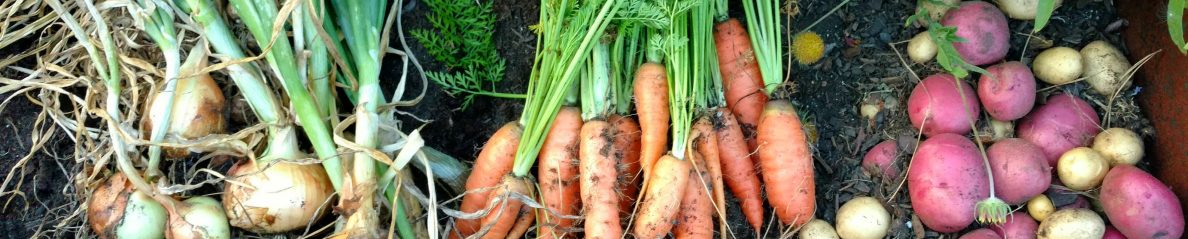
Then the next day, I planted lots of pansies and violas in my gardens. I am not sure why I never (!) have planted pansies before but I love them so much!

IMG_20171107_161845614-EFFECTS

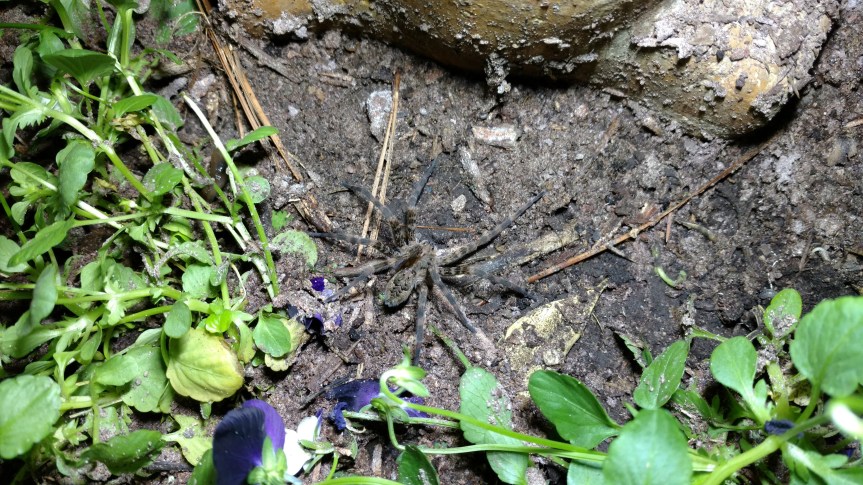
And as I stepped out to check on the garden that evening, I saw these critters. We have a cute little toad and a massive spider. I have only seen three of these spiders in the nine years we have been here, but counting his legspan, it is easily as wide as my palm. Ack! It’s a good thing that I like spiders. Perhaps even more creepy is how well this little feller mixes in with the background…

IMG_20171105_192521990IMG_20171105_192529659

With all of this extra time I now have (thanks to my Facebook reduction), I decided to get back to sewing. I have a love/hate relationship with sewing. There are times when that’s all I want to do, and then when it gets frustrating, I want to throw my sewing machine and all the fabric and sewing notions right into a burn pile. I had to use my seam ripper more than someone SHOULD on this dress. To be quite honest, I had to go to the store to get another seam ripper as I dulled my first one, if that tells you anything. Anyway.

It is a Dottie Angel design; Simplicity 1080, if you’d like to see the pattern. I plan on throwing on some leggings and doing farm work in it. I had read several critiques of this pattern and they are not unfounded. There are definitely parts of the pattern which just seem overly complicated. I still have to hem it and then figure out how to fit it properly so I don’t have the ‘back bunching’ that I have going on now. Losing 10 pounds would help, but until then, perhaps some well placed darts will do.

IMG_20171107_141949252

Later in the week, influenced by my dear friend “Big Rig”, I went to the dollar store to get some holiday “day-core”, as we say. Of course, all of the fall/Thanksgiving items were gone with exception of a lonely package of plates, some fall napkins, and a vinyl tablecloth, despite the fact it was only the first week of November. Actually, I want to say it was November second, perhaps? So a word to the wise, if you need autumn ‘day-core’ at the dollar store, you’d better head up there in August, I guess.

Even though I was pretty peeved that it looked as though Father Consumerized Christmas had just upchucked his wares on half of Dollar Tree, I just could not pass up the gold glitter deer head. So then I had to pick up a tiny dollar tree, a tiny strand of LED lights, and some gold ball things in the floral section. I grabbed a roll of gold glittery tulle (hint: UNWRAP IT OVER A TRASH CAN, unless you want your entire house coated in gold glitter). Yet, one deer head was just not enough.

Then it was a trip “up to the Wal-Marts” for more deer heads and tiny pinecones. All told, it was under ten dollars for my little redneck tree and I love it.

IMG_20171108_131649999

To finalize my week, I have been re-reading about the Danish concept of ‘hygge’ (pronounced ‘hue-gah’ or ‘hoo-gah’, depending on who you listen to). I had looked this up several years ago, being the trendsetter that I am and all (NOT), and I love love love the idea of hygge.

What is ‘hygge’? From what I gather, hygge is:

  • Snuggly blankets
  • Fireplaces
  • Wool socks
  • Cinnamon buns
  • Cake
  • Hot tea/coffee
  • Candles…many candles
  • Friends
  • A purring cat
  • Soft lighting (read: more candlelight)
  • Books
  • A cozy chair
  • Togetherness
  • Unfinished pine wood
  • Anything you can find at IKEA, surrounded by purring cats, lit candles, friends and family wrapped up in ‘cosy’ blankets wearing wool socks in front of your roaring fireplace, shoveling cinnamon buns and cake in their mouths while drinking hot tea/coffee and reading long, engaging and meaningful novels in a room preferably with either unfinished pine walls or an unfinished pine table.

And that, friends, is ‘hue-gah’ for you! So I would like to present my little snippet of farmhouse hygge to you. We have a purring cat in his cozy bed in an IKEA bin. Please note that this IS in a room with unfinished pine walls (unseen in photo).

IMG_20171109_135438783_TOP

For more hygge ideas, there are now a bajillion books, e-books, and websites dedicated to this 2017 word of the year, or, you can simply order a free IKEA catalog, curl up on your couch with a warm blanket and hot coffee, and peruse the pages at your leisure.

Until next time!

The Craft Room: The Final Chapter (almost)

So, that brings us to how the craft room looks today.  Are you ready? Are you ready?  huh, huh, huh, huh, huh?  Okay, well, come on then!

Does that font scream Vicki Lawrence or what?  If you have no idea what I’m talking about…I’m not sure we can be friends.  Anyway,to the left you will see a big cabinet. One half of it has drawers and the other half is sliding shelves. On top, notice the funky blue genie lamp given to me by my dearest mother-in-law who was going to get rid of it.  Then, the white sewing cabinet is my standard go-to Kenmore machine.  My mother gave me that machine in 2000, and it was her old cabinet.  More on that in a bit.

Don’t you just love pegboard?  Sigh.

Here is my table and chairs that I got for 100 bucks off of CL.  When I first saw it, I just couldn’t decide if I loved it or hated it.  I had to look at the ad about 10 times before I decided I’d call about it.  As it turns out, it fits perfectly in here.  Esmeralda was the dressform given to me by my mom’s friend.  I have padded her to look more like…me.  Yes, I look like an hourglass.  Hush up.

And there’s my happy little blog on my laptop.  I was thrilled that I could actually get signal way out here.

Here is that metal rack.  I covered it with my $3 garage sale quilt via clothespins to hide all that ‘Junque’ that it contains.  On the lowest rack is my batting/Polyfil/fabric scraps which are stuffed (!) into vintage suitcases.  Yeah, I was too lazy to show you that.  I also spray painted my cheap little radio turquoise and that’s where it sits.

My chalkboard door and my tin wall.  I drew that picture (pointillism study in art class back in ’99), and I just really like it, so I stuck it there.  I doodled a sign on the door just…because.  See my old typewriter?  I own two.  Love ’em.

This was my mom’s old sewing cabinet.  I should title this pic “Pimp My Cabinet”.  A week ago, it was that hideous speckled 1970s brown.  Now it is Dover White and I sanded all the corners.  I decoupaged the cabinet doors with vintage fabric from my Mamaw’s attic.  Coming soon:  Glass knobs.  I also applied clear Contact paper on the top to prevent smudges.  The paint that I had was satin, so it tends to kinda absorb dirt.

Detail of shelves/pegboard.  The clock was a present from my Papaw.

And here’s my favorite ad on the whole wall.  Because nothing screams class like fine imported cheese, hors d’oeuvres, and cheap domestic beer of the half-quart variety.  You have to love the 60’s.

Hope you enjoyed!  Of course, I’m not done.  Not done until I can fill the walls with tacky vintage items that no one else in their right mind would want!


Craft Room: Part Two (PrimeTime)

Time to prime things up.  We used Zinsser 1-2-3 Bullseye.

And here we begin to cut in with our paint.  I love, love, love turquoise.  Is it original to paint your craft room turquoise?  NO.  But I don’t care.  Turquoise is in my own made-up holy trinity of colors consisting of:  Red, Peace yellow, and Turquoise.  It’s what I love!  I thought about light yellow walls, but I also wanted something more relaxing.  So, I went with blue.  To be exact, it’s a Glidden color from Wal-Mart.  Something like Aqua Seacrest or something like that.  I’ve slept since then.  I just knew I wanted it when I saw it!  Here is some more detail to that shelving/pegboard.  The shelf is actually 2 inches thick.  It’s a leftover piece to when we re-sided our house with cypress.  Gotta be STRONG to hold up those old sewing machines!

*note the beer bottle.  “Build it, and he will drink.”  Wait…that’s not right.  Is it?

And a view from the doorway:

Now came some CRAFTILICIOUS FUN.    I had been saving a whole stack of early 1960s ads just for this purpose.  I decoupaged the back wall with them. So much fun and now I really want a perfume with the scent of ModPodge.  Yes, I love it that much.  (No, I wasn’t sniffing ModPodge when no one was looking) Here ’tis:

Now is that some fun or what?  I love the hot pink in the ads, plus my ‘Holy Trinity of Colors’.  Now you can see why I went with Dover White on that pegboard.  I didn’t need any more color!  You can also see Jason installed my fan (not really a vintage looking fan, but hey, it was all we had in town).

Time to add something else…some old tin to the back wall.  We scavenged this tin off of the back part of our property, which we have deemed “Appliance Hill”.  Previous property owners had dumped tons of junk back there, including this cool tin.  I wanted to have a magnetic surface in my room to put up patterns/whathaveyou.

Now came baseboards (1″x6″ boards) and ‘crown moulding’ (1″x4″ boards).  And then caulk…lots of caulk.  Fortunately, I’m the Caulk Queen (a self-designated title), so that went quickly. I also wanted a chalkboard surface, just for some fun, so the back of the existing door was painted with Krylon latex chalkboard paint (2 coats). The last picture was taken on October 1st.  The next weekend, we went and picked out flooring.  There was a laminate flooring on clearance for 28 cents a square foot (!!!), but I reeeeeally didn’t  like it.  It just oozed “Cheap”.  And you know you shouldn’t ever ooze ‘Cheap’.  At least that’s what my mom always told me.  Anyhoo, I went with a $1.69 sq/ft plastic laminate that had a ‘hand-scraped’ look and I looooove it. We put it in by the next day.  So yes, most of this was done in about oh…5 days total!

AND NOW LADIES AND GENTS, I WOULD LIKE TO PRESENT YOU WITH THE NEW AND *IMPROVED* CRAFT ROOM…..(con’t)

The Craft Room Metamorphosis

For three years now, ever since we moved into this house, I have been longing for a craft/sewing room.  First of all, I have a LOT of craft stuff around, and it’s an accumulation of about 15 years.  Secondly, I think everybody needs their very own creative little space.  While I did have a corner of our dining area, there was no way it was large enough to house my smorgasbord of crafterie (my own just-now-made-up word).  Mostly, it’s sewing stuff/fabric, but I also have a lot of scrapbooking bits, painting stuff, and kid’s crafts.  So, for three years, I’ve had my eye on a small 10×12 room which is located inside of our workshop.  Originally, it was built to incubate emu eggs.  Yep, you read that correctly.  Back in the hey-day of emu oil, the former owners and my neighbors had a small emu co-op, where they raised and sold emu.  So, this little room was well insulated, and as an added bonus, it was fitted with about 12 plugs at 3′ off of the ground for the incubators/brooders.  No more reaching down to fumble with plugs!  Yay for my aging back.  So let’s go allllll the way back to last winter when we started with this project.

In the beginning, there was a window.  It was, well, a fairly (cough) crappy little window with the bottom glass pane that somehow mysteriously hung on despite only being attached to the frame at the bottom of the sill.

Notice the lovely coordinating black plug/outlet which was also slathered with glow in the dark paint.  If you will look at the floor, you will now see the oh-so-lovely plastic trim baseboard. The door opens out to my husband’s Man Cave.

Now, here comes my wonderful husband to start this project right:

And then:

Shhhhh, you have to promise to not tell Jason I have a picture of him on here in his slippers!  So as you can see, he is measuring now to put in my very own door, which I scored for free off of Craigslist.  And here is the door:

And there she is!  Whew, aren’t you tired?  I know I am!  (I broke a sweat watching him install the door while I sat around taking pictures.  I’m a really great help.)

Now moving right along, let’s fast forward through this hideous, sweltering summer and get to some nice fall temps so that we can begin on our little project again.  Picking up on September 25, 2011:  Looking into the room:

Note the Beee-youuuu-ti-ful sponged walls (which we had dubbed Diarrhea Green and SoulSucking Blue), the missing fan, and the holes in the sheetrock, thanks to my parrot.  Here is the A/C window unit that Jason mounted into the wall, and my metal storage rack, chock full of junk:

Nice, huh?  So first we ripped out the plastic molding by the floor.  Then filled the holes in the walls with spackle.  Jason mounted a 4’x8′ piece of pegboard and a shelf for my 19 zillion antique/vintage sewing machines.  After that, we spray painted that pegboard Dover White.  (Note to self:  I think I lost 1/2 my brain cells over that.  Do not repeat.)  Now to prime all the walls!  (continued in Part two)

2010 Christmas craft

Well, I always get a little crafty around Christmas…especially when it comes to repurposing things around the house.  I’m one of those people who hates to throw out things because, God forbid,  one day I will discover its alternate ‘purpose’.

Jason (my DLSH*): Can I throw away this broken toothbrush?

Me: Oh, nooooo!  I’m hanging onto to that.  I think I can use it for a craft or something.

Jason (rolling eyes): Amanda, it’s missing all of its bristles and the handle broke in half.

Me (avoiding eye contact): I know, I know, but one day it’ll come to me what to do with it.

And so, he will set it on a high shelf, sighing heavily.  19 months later, as he’s cleaning out the barn, he’ll slyly throw it in the trash, burying it deep.  Within 12 to 24 hours of it being tossed (and that is the honest-to-God truth), I will have a crafty vision involving the broken toothbrush…a perfect use sent straight from the God of Crafts, Hobbies, and Repurposing.  I go look for said toothbrush and can’t find it.

Me:  Hey, where’s that broken toothbrush that was on this shelf?

Jason: You’re freakin’ kidding me.  Are you serious?

Me: Yes!  I just discovered this PERFECT thing I can use it for. You didn’t throw it away, did you?

Jason (sighing so heavily he almost faints): (digs in trash can, hands it to me silently)

Me: I can’t believe you’d throw that away!  See? I TOLD you I’d find a use for it!

*Dear Long Suffering Husband

I literally can’t tell you how many times this has happened.  Like the patio umbrella cover.  The umbrella part died, but the cover remained.  We found the thing out in the woods about 2 years ago.  Last spring I found that my DH had thrown it in the trash, when suddenly it occured to me that it would make a GREAT cover over my mobile chicken brooder.  See?  Keeps out the wind and rain and it was totally free.

So anyway, going along that repurposing vein, I have some old Coke metal trays.  They’re from the 60s and they are UGLY.  I mean, who would have ever thought that a picture of a big buffet of food, a chafing dish, and a couple of poorly placed Cokes would ever have been attractive? So, I decided to cover up the hideous picture with some vintage Santa wrapping paper.  I covered it on both sides with clear matte Contact paper to make it wetproof and durable.  Then I thought; hey, it’s a metal tray, so why not make it a magnetic note center?


Phase One:  Cutting out a piece of the vintage wrapping paper.  If you could see the tag, it is addressed to my grandparents from my uncle and aunt.  Probably from the 1970s.  (Mom…cover your eyes.  Yes, I used the Gingher scissors to cut the paper.  Please don’t freak out)

Phase Two: After carefully cutting out the shape of the inside of the tray, I cover the top of the paper with Contact paper, and gently ease out the bubbles.

Phase Three: Now I have covered the back of the paper and now it’s time to trim off the excess Contact paper.  I left about 1/8″ around the edge so that it stayed sealed.

And here we are! I put on some magnetic bulldog clips to hold the paper in place, since I did not want the Santa paper to be permanently attached to the tray…and I was too lazy to grab the double sided tape!  I used it to display Christmas cards.  Very cute.  I thought about spray painting the tray, but I liked the decorative edge.  I spray paint EVERYTHING, so it’s strange that this escaped my Krylon fixation.

Sorry about the terrible quality of the pictures.  I forgot that I don’t have an editing program on this new computer yet.  :0(

Enjoy!

Makin’ Soap/Savin’ money

So, the other day I had the opportunity to watch my friend make soap from scratch using the cold-process method.  This means that she takes fats (i.e. coconut oil, palm oil, vegetable oil), combines them with lye/water mixture, and saponification (the process by which soap is made) occurs.  Fascinated by the process, but not brave enough to work with lye, I looked at different ways to make homemade soap.

One method, which I can’t wait to try, is called hand-milled soap.  You buy a plain white bar of soap (and it MUST say soap on the package, otherwise it’s actually detergent!), you grate it up, mix it with a little water, add your own ingredients such as essential oils, etc., and then pour it into molds.  It is ready to use pretty much as soon as it cools, unlike cold-process soap which takes several weeks to properly cure.  Plus, you don’t have to deal with lye.  I mean, after all, I am a person who frequently falls down stairs and trips over her own feet.  Handling a caustic chemical probably isn’t the best decision for me!

Anyway, the other method I looked into was how to make your own liquid soap.  Since I had everything I needed to make this (soap and water), I decided to go with that.  So, here’s what you do:

How to make Liquid Soap

Now, I did not want to funk up my blender with soap bits, so I put the soap/water mix into a big Pyrex bowl, which I had set in a larger pot 1/2 filled with water on the stove (homemade double boiler).  To mix it up, I used the drink mixer attachment on my hand mixer.  You don’t want to try and do this with a spoon because it will take FOREVER for the soap to dissolve.  The only downside to using the mixer is that the soap mixture does get pretty sudsy, though this resolves a bit after it cools and rests.  My only mistake was not using a spatula to clean the sides of the bowl while I was mixing, thus, little annoying unmelted soap bits remained, so I seriously doubt it would work well in a pump!  BUT, that’s operator error.  Another thing you can do is grate the soap, then mix it with a cup or two of water and let it sit overnight to soften the soap really well so it will blend better.

Here’s my pictorial for y’all:

First, gather thy ingredients and supplies.  The soap is in the little plastic bowl.  I used 5 drops of tea tree and about 8 drops of tangerine oil, added at the last stage of the process, when the soap is completely dissolved and all water has been added.

Get your double boiler readyI used low heat.

Here is the soap after I have blended it just a bit.  You can see that it is still not well-dissolved, so back to the mixer for me.

The end product.  It will have the consistency of yogurt/pudding.  You don’t want it so thick it won’t work in the pump though.  After I stuck my hand in it, I realized there was still more clumps.  Boo hoo!

So there you go, yet another way to save some money!