The Old Grey Mare…

It’s true.  She AIN’T what she used to be.  I’m mad at myself for not getting my rear on here and blogging.  Irritated that I’m too lazy/tired to upload you some pics.  But it’s spring, and on the farm, that’s super busy time.  Please accept my apologies!

Well, life on the farm is back to its usual hectic pace.  We bought 15 broiler chickens after the junior livestock show, and butchered and processed nine of them.  Please be assured that it is the best tasting chicken EVER.  And, they probably lived out the best week of their life here.  If you are ever interested in processing your own birds, I highly suggest watching videos on Youtube by Joel Salatin of Polyface Farms.  I did a mini refresher course before this batch of birds just so I didn’t forget anything.

I bought eight Broad Breasted White turkeys for butchering later this year.  I plan to grind the breast and leg meat.  I just bought 3 Narragansett turkey poults for breeding purposes.  They are a ‘heritage’ breed of turkey, and can breed normally (broad breasted birds need AI to get the job done), and supposedly have a better flavor than the BB turkeys.  Earlier this year, I was given a Showgirl rooster whom we named Ernie.  Ernie is, without a doubt, the funniest chicken I have ever seen…he even ‘one ups’ the famed Wayward Jones.  I knew he was gonna be a really special one when I gave him a bath with no chicken complaints and….he loves the blow dryer.  Don’t ask me how these critters find me, but they do.  Now I have 17 baby Silkies, hopefully at least some of which are females, who are destined to be Ernie’s ‘lady friends’.  Yes, I want to make more of these odd looking chickens.  On purpose.

Then, the other day, I was at a feed store when I saw the ugliest chick I’d ever seen.     And so, ‘Poindexter’ came home with us for a whopping $1.79.  He/she is a Naked Neck, and bless it’s heart, it’s not even normal.  Its wings are deformed and it will never be able to fly.  See…they find me, I swear it.

A few weeks ago, we bought a 250 pound (or so) Hampshire pig and had him sent off to the processor’s.  We got back 145 pounds of meat.  Fifty seven pounds of breakfast sausage, a ton of chops, 2 racks of ribs, soup bones, 2 roasts, and about 8 ham steaks.  I can honestly tell you that the sausage is the best sausage EVER.  Also, I know that this pig was raised in a pasture and not in a cramped, filthy cage somewhere a la Smithfield! (Take that, Paula Deen) It makes it taste that much better.

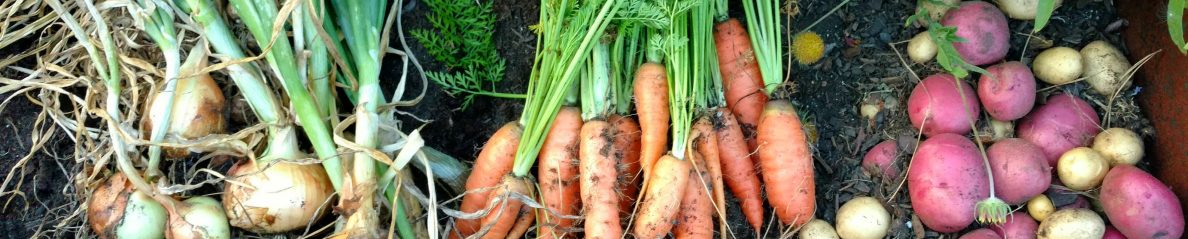
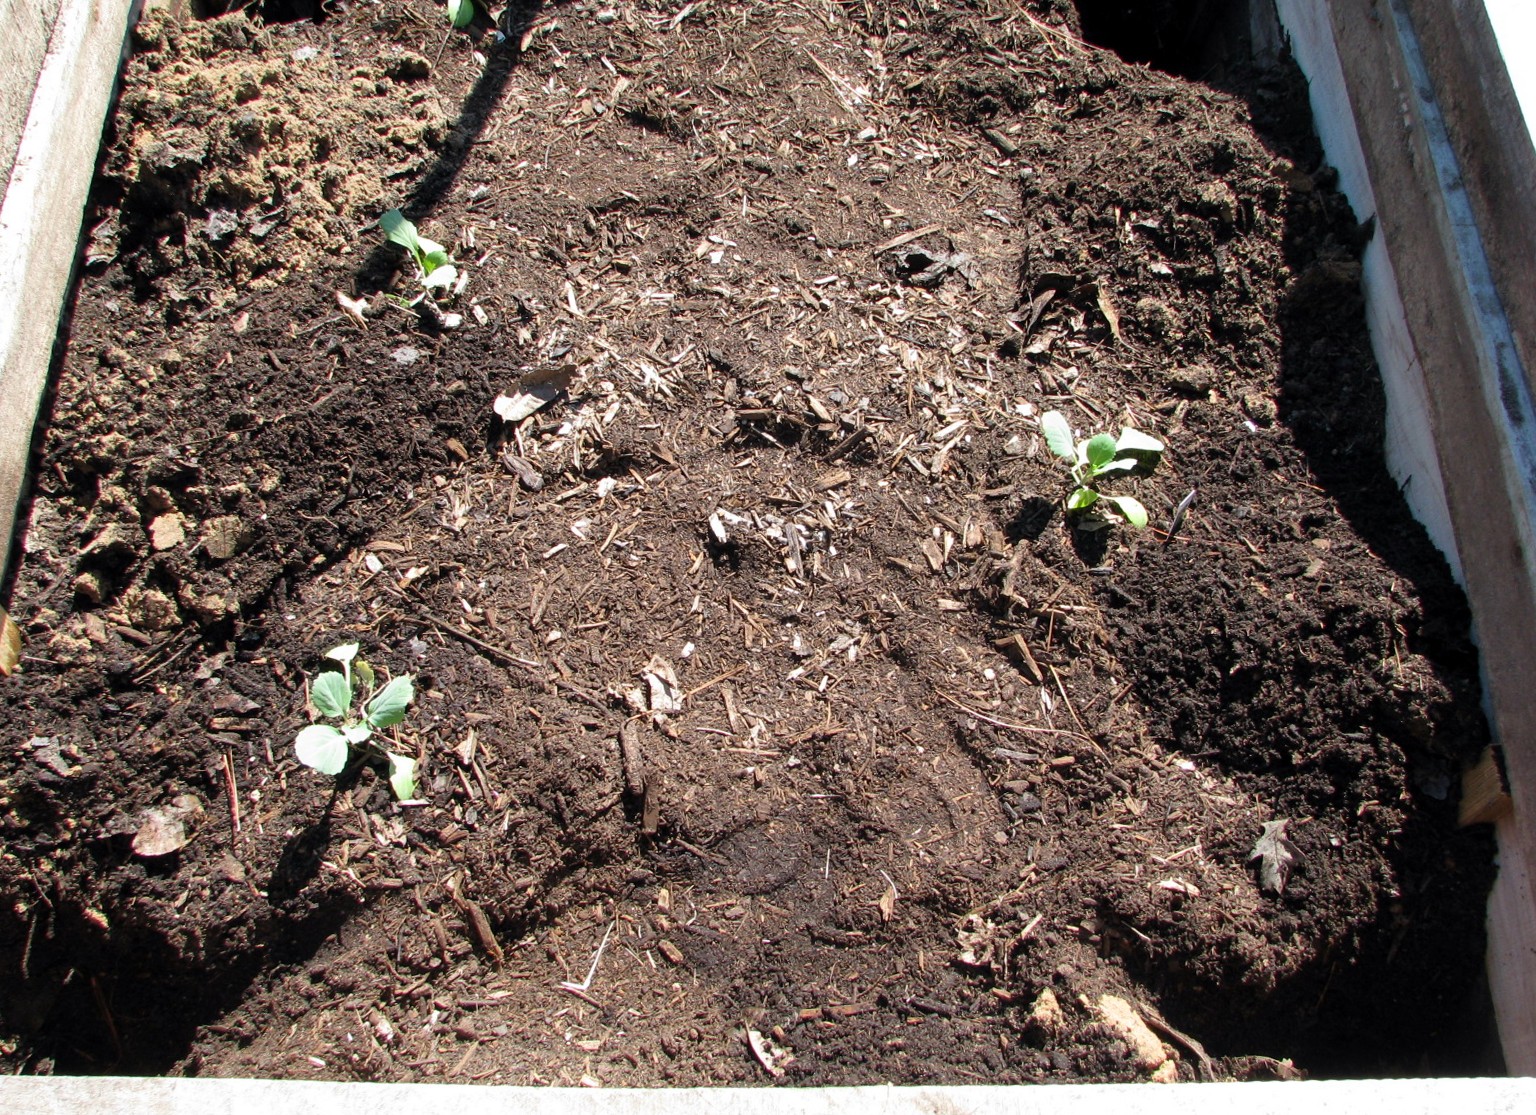
In gardening news, I am trying a trellis method for my tomatoes this year.  Thus far, it looks great.  I am happy with it.  I hate tomato cages!  I also am experimenting with mulching right now.  I am using newspaper and cardboard over the ground, then covering it with mulch on my new beds/garden plots.  I HATE BERMUDA GRASS.  I hope every piece of it dies in my yard, seriously.  It is the bane of my existence!!! So, I am hoping that my lazy-man’s method of weed killing will work. So far, it seems to be doing well.  We added 3 new ‘gardens’ to the front yard this year.  I have planted a coupld of apple trees along our garden wire fence to try and create some espalier trees.  We shall see.  I noticed last week some huge inflorescence on my Champanel grape vine that I really whacked back in February.  I am trying to train it along the fence, as well.  I still have a ‘Carlos’ bronze muscadine to plant on the other side of the fence.

I ripped out the cabbages and (completely non-productive) Brussels sprouts today.  Amazing how every year I discover a new insect that’s trying to eat what I want to eat.  This year, the calico bugs were covering the cabbages and sprouts along with the dang cabbage worms.  Sigh.  Every year, I think: Are you freakin’ kidding meAnother cabbage pest???  I’ve already had it out with cabbage maggots, cabbage loopers, cabbage webworms, and now calico bugs?  I’m surprised that cabbage isn’t worth its weight in gold.  And, this year, for whatever reason, the cutworms were HORRIBLE.  I lost more onions and tater plants to cutworms than ever.  Ernie, however, was more than happy to provide the intruders with the famed “Death By Chicken” sentence handed down from me.

So, now to wrap up this boring update.  Out to the greenhouse I go to water the plants again.

Busier than a one legged cat

Well, as we all know, fall is an insane time of year.  After Halloween, my days turn into minutes and before I know it, it’s the New Year.  I have spent the last few weeks baking and preserving and doing all THAT.  I decided a few weeks ago to finally clean out our deep freeze and actually do something with the many bags of juice and tomatoes that I had.  So, with the blackberry juice and the blueberry juice, I made some jelly.  This time around, I used a new type of pectin:

I think that maybe I just bought it because I loved the box.  Seriously, I wanted a low-sugar pectin and had read about this type (low-methoxyl).  It’s very easy to use and causes your jelly to set up rather quickly.  In fact, it gels so well that I should have reduced the amount of pectin called for, since it made my jelly have a ‘jelled cranberry sauce’ consistency.  Anyway, the results were delicious, so who cares?

Here’s the jelly coming to a boil.  I love that color.  Sigh.

Then, a few weeks before that, we had our first ‘freeze’.  Hahaha.  Joke’s on me.  It didn’t really freeze, but since I thought it was going to, I harvested all of my peppers:

As you can see, it was quite a bit.  We were in a hurry, so we threw it all on a tablecloth in my kitchen.  Next came a few hours of chopping and freezing.  Anyway, I’m gonna brag about my peppers here since I have never really grown any great bell peppers.  This year was different.  I got my best peppers in September and October (they were planted in April). Best variety this year?  “Jupiter”, hands down.  I plan on planting lots of those next year!

My biggest bell, a Jupiter:

Trust me, it was a biiig pepper,  even if it was only 4 inches.  Oh well.  I won’t make any lewd jokes here.  So, what are the secrets of growing good bells?  Picking a good variety, fertile soil, and keeping them well-watered.  Not WET, mind you, but in high summer when the leaves droop a bit, your butt had better be out there giving them some water.  Otherwise, the walls of your peppers will be paper thin and pathetic.  You know, like mine were last year.  Moving on…

Mmmmmmm.  Cinnamon rolls.  Who doesn’t love fresh rolls?  I made so many a couple of weeks ago, I didn’t want to look at another roll, or even eat one.  For a great recipe, you can go to Allrecipes, and search for ‘Clone of a Cinnabon‘.  I used the icing from that recipe, but for the actual bread, I used their ‘Sweet Dinner Roll‘ recipe.  Why?  Well, I found that the Sweet Dinner Roll recipe is extremely easy to do and also extremely versatile.  Plus, I memorized it.  And maybe to a lesser degree, I was offended that the ‘Clone’ recipe calls for MARGARINE.  That’s like a slap in the face. Sure, sure, I know I could substitute butter, but….

Mmmmm.

Well, so that’s what I have been up to.  That and the winter garden.  But I don’t have any pics for you of that, so it will have to wait.

Now, I will leave you with a picture of my faaaaavorite cornbread…my Mamaw’s recipe. I’ll have to add it to my blog so you can experience it, too.  I love ‘cakey’ cornbread with a little bit of sweet.  I don’t like cornbread that you have to swallow an entire glass of tea with because it’s so dry.

Millions of peaches, peaches for me

May I apologize now to you, dear readers, for I have neglected my blog somewhat.  Two things have kept me from being a faithful blogess…#1, my computer came down with a virus.  Well, actually three viruses.  I have had the same computer for seven years and have never had a virus.  Oh, what I would love to do to the little programmer who came up with my viruses.  A baseball bat does come to mind.  Anyway, the good news is that my Jason bought me a laptop to take the place of my ill computer (who is fixed, but anyway).  #2 reason is that it is, as the weather service has been fond of saying lately, OPPRESSIVELY HOT.  When it is OPPRESSIVELY HOT, my brain does not function well.  I become gripe-y and snippy and say things which I would otherwise reserve for my mid-month part of my ‘cycle’.  So, to protect you, the reader, from any more long and annoying ‘On my Soap Box’ posts, I have just refrained from writing for a while.  Now, on to something non-snippy:

This, apparently, was a banner year for peaches.  If you had a properly kept peach tree, you had a ton of peaches.  We severely trimmed back our old, overgrown peach tree last spring.  I wasn’t even sure if it would survive.  It looked like a terrible tree massacre had taken place, but our extension agent who performed the job assured us that it would put off a ton of new growth, on which peaches would form.  Well, either that or it would die from shock.  Happily, it chose life over death and survived its pruning session.  Here are some before and after photos:

As you can see, this peach tree is quite tall with a lot of vertical growth.  Ever drove by a peach orchard?  You will notice that peach growers keep their trees very small, no more than about 8 feet tall or so, if even that.  It makes for more fruit since the tree does not have to put as much energy into all of those branches.  The vertical growth doesn’t produce peaches anyway (they are called water sprouts/shoots), so by removing them, your tree can concentrate more onto making you some lovely peaches.  Here is Joe about to perform some major work:

Now, as you can see, the tree has lost most of its vertical growth.  With peaches, you want the tree to look bowl-shaped, with an open center for ventilation, and keep growth horizontal.  He did leave some smaller branches to try and prevent sun scald on the tree when it did leaf out, since the tree was used to a lot of shade.

Now that the tree had been trimmed, it was just a game of wait and see.  That year (2009), the tree decided to live and it prospered.  There was a ton of new growth to try and replace what had been taken.  So, in February of 2010, we trimmed her again.  This time, not as severely, but mainly any water shoots.  By March, the tree came alive with tons of pink blooms:

We were so excited.  The big killer of peaches around here is an early frost.  Even though this year we received two snows which NEVER happens, we were fortunate enough to not get a late frost.  What often happens is that after flowering, a late frost comes along in April and kills all the little baby peaches trying to form.  Well, this year, that didn’t happen, and we were rewarded by many, many 10’s of pounds of peaches.

I wish I could give you the final tally, but unfortunately, my scale broke in the middle of weighing one day.  My estimate would be a good 60-70 pounds…maybe a little more for that one tree!

So, what do you do with 60 pounds of peaches?  Well, I hate the taste of canned peaches, so I froze them.  It’s very easy to freeze peaches.  First, I take the fresh ones and dunk them in boiling water for about 45 seconds.  Then I put them in a big pot of ice water for a couple of minutes.  This allows the skin to peel right off like magic.  This is also how I peel tomatoes that I am going to can.  Anyway, then you peel them, and I sliced them into halves.  I simultaneously kept the halved peaches in a bath of water treated with Fruit Fresh (calcium citrate, I believe).  This prevents browning.  When you freeze peaches, they need to be in a sugary liquid.  Some people do actually use a sugar/water concoction, but I used organic apple juice instead.  I mixed the apple juice with some Fruit Fresh…whatever the directions on the Fruit Fresh recommend.  I think it’s a teaspoon per cup of liquid or something like that.  Then, I put the peaches in a Ziploc gallon bag, and poured enough of my apple juice concoction on them to cover about 3/4 of the peaches.  I lay the bags flat and freeze them on a cookie sheet so that they freeze nice and flat, too.

Forgive the pictures, they’re not great!!!

Rainwater Harvesting

Here is my late spring herb garden, picture was taken today.  In it, I have several kinds of thyme, rosemary, horehound (I’m not making that up), oregano, dill, catnip, catmint, basil, chives, and sage.

So!  For the last several weeks, we have had NO RAIN.  I mean, I was starting to really get worried there for a while.  Typically, our April/May months provide a pretty good amound of rain to tide us through the beginning of summer.  I cursed myself for not collecting more rainwater when it was more plentiful.  I have been collecting rainwater in plastic trash cans for several years now, though not very efficiently. I tend to forget about them…but not this year!  I used my gathered rainwater exclusively for my baby tomatoes this year. 

Anyway, after this mini dry spell, I really got to thinking about water usage and collection.  I mean…almost on the verge of obsessively thinking about it.  How much water do I use washing eggs?  How much do I use in the shower, or bath, or rinsing plates? 

There was a good reason for our grandparents using a ‘dishpan’.  I so happen to have two ‘dishpans’ and so now when I am washing eggs, or rinsing plates, I have been dutifully collecting the runoff and putting it in my garden.  This water is called ‘greywater’.  Your water that is used in your potty is called ‘blackwater’.  Anyway, there is definitely a lot for me to learn about re-using greywater.  I hope, one day, to have my kitchen and shower water diverted to my gardens.  Today, I even scooped out the bathwater after the kiddos got out.  This is NOT something you want to apply to a veggie/herb you will eat raw, though…..as, well, you know…there are ‘booty germs’ in it, but still, it watered the daylily garden anyway. 

Well, so the other day, we got a really nice rain.  I ran like mad to set out all my water collection buckets (read: anything that would hold water).  It’s amazing the amount of water that runs off of a building during a good storm!  We had tons of water, which we deposited into a couple of our water trashcans.  I also went and bought an aquarium gravel siphon @ WallyWorld, to, theoretically siphon out bath water (note to Self: the law of physics prevent this from happening in the manner I had hoped.  So I failed Siphons 101)  So, today I was walking around our shop, and we have 2 jet skis that we are keeping for someone.  The place where your feet ride was FULL of rainwater.  Well, so….I took my siphon and my trusty 5 gallon buckets:

And, out of all 4 footwells, I got almost 20 gallons of water!  So then, I took that, carried it to one of my trash barrels, threw a piece of screening that I found on the side of the road (I KNEW I’d find a use for it!!!) and poured the water through, to screen out the yucky stuff:

My future plans are to utilize some 55 gallon drums into an official rainwater gathering system. 

Water restrictions can happen anywhere at any time, so I want to do my best to be prepared for the worst.  Yay for saving free water!

Cut that out!

If you have been reading my blog, you will know that this year is the first year I have started tomatoes from seed.  If you have never done it before, you cannot realize how much you get attached to a plant. 

When the seeds first broke the soil, I clapped my hands in excitement.  When they put out their first set of leaves, I gathered my family around to celebrate.  I somehow managed to keep them from being mutilated even though they are in a house with my husband, 2 kids, and 2 crazy dogs.  I babied them like I have never babied a plant before, making sure they only had organic fertilizer with rain water.  I talked to them and petted their leaves gently, and we talked about how many tomatoes they would give me in return for my diligent efforts (hey, what goes on in the greenhouse, STAYS in the greenhouse!). When the time came, on Easter, that they were to leave their pots forever, I think I had a tear in my eye as I lovingly patted them into their compost rich beds.

So, imagine my horror when the other day I was strolling through the garden, checking up on ‘everyone’, and one of my Snowberry tomato plants was….gone.  My mind was reeling and I felt nauseated.  I fell to my knees, sobbing, crying to God “Why, oh whyyyyyy????” (ok, not really) and there I saw the culprit.  A cutworm.  He was happily STILL MUNCHING on my precious, heirloom, spoiled Snowberry tomato plant.  He saw me coming and tried to duck back into the ground.  Nope, that just ain’t happening.  You do the crime, you’re gonna pay the time!  I ripped him out of the ground, calling him a very vulgar name which I will not repeat here (and, after all, I did feel a little bad about saying it… I mean, maybe cutworms DO know who their fathers are, after all?) and gave him an immediate conviction sans trial.  The punishment?  Death by chicken.  It was the worst possible thing I could think of.  While I would have loved to smear him into the grass, the thought of allowing a chicken to peck him to death, while throwing him several times in the air made me giddy. 

He in still in death row, sitting in a little glass bowl.  Execution will be today at high noon for those who wish to attend.  No funeral has been scheduled, however, in lieu of flowers/plants/casseroles, a donation may be made to the Tomatoes Cut Down In Their Prime fund.

Tomato Time Tutorial

It’s tomato time!  Well…almost.  Today we got a nice, lovely blast from the Arctic, with winds up to 35 mph and 32 degrees tonight.  I am NOT happy about it, but oh well. 

To cheer myself up a little bit, I am posting a no-frills how-to on planting a tomato.  First off, we are going with the assumption that you have your soil all ready.  I plant in straight compost in my raised beds.  Ready?  Ok…

 So gather up your gloves (my new fave: nitrile treated microfiber gloves made by Atlas ~ $6), your trowel, and your ‘mater plants.

Well, as usual, I’m getting ahead of myself.  When you go to buy your little plants, always read the tag.  The tags give you all of the pertinent information.  In this case, you will see the description, followed by the word ‘determinate’.  Tomatoes come in 2 main varieties.  Determinate and indeterminate.  A determinate tomato is a plant which is more like a bush.  It will make fruit and after you harvest, it’s productive life is over.  An indeterminate tomato is a vine.  The plants can get absolutely monstrous, but it will continue to produce until it gets too hot to set fruit (when nighttime temps get above 70 degrees, you can pretty much forget fruit on MOST tomatoes), or until frost.  For example, I set out Roma tomatoes and Brandywines last spring.  The Romas are determinate, they made a nice, big bush and produced well in early summer.  Brandywines are indeterminate, and had a trailing form, with lots of fruit in both the early summer, AND in fall.  I decided to leave the Romas in through the fall to experiment, and though it produced a beautiful plant, I got the ugliest, tiniest tomatoes come fall.  And about 4 of them at that.  Anyway, so now you know the difference.  I prefer the indeterminate types myself since I like to plant once! Next, this tag gives you the maturity date.  That is, from the time you put the plant in the ground until you are able to harvest the fruit.  This is very important!  It also gives you recommended sun exposure times (full sun is like 8-12 hours a day), and how far apart to set out plants. 

Before you remove the plant from the pot, remember this….on most tomato transplants, especially ‘leggy’ plants, you will want to remove the few sets of leaves closest to the soil.  Then, when it is planted, roots will form on this stem that you have created, and it will strengthen the plant and help it to be more stable and upright.  I just pinch ’em off with my thumb and forefinger.  On this plant, it wasn’t really too leggy, so I only removed 2 lower sets of leaves.


Here you can see what I pinched off.

Now, here is what the plant looks like with the lower leaves all gone, and ready to plant:

Here is the plant removed from the pot.  You can see that the roots are good and healthy and not too crowded (rootbound).  Ideally, you will not want to start with rootbound plants. 

On all plants that I plant, I always break up the soil gently and work out the roots just a bit.  On really rootbound plants, I will actually take a knife, whack off the very bottom of the whole thing, and cut an ‘X’ on the bottom and along the sides of the rootball.  This isn’t the case here, so i just teased the roots a bit, being careful not to damage them.


Now, I set the plant in a hole which is a bit wider than the rootball, and deep enough to cover those removed leaf scars I have just made on the stem.  You can see that my soil is pretty sandy stuff, but it’s got a whole bunch of compost added into it actually.  Kindof hard to make out in this photo.

So now you will fill back in your soil, packing it gently to remove any large air gaps.  I also did something that I have done previously for some transplanted roses.  I took the pot that the tomato was in and buried it next to the plant, up to the lip of the pot.  When it is watering time, I fill up the little pot a couple of times and in this way I know that the water is actually reaching the roots.  You can also use soda bottles with the tops cut off, just poke some holes in the bottom before burying it.  This worked really well for the roses, especially in the drought of summer.  Honestly, I had pretty much forgotten that I had done that, and then I saw an ad for something similar for an orchard, and thought, “Aha!”.  I’ll just use my ingenious mind to come up with something cheap.  Lol. 

Now set your tomato cage over your baby plant and you’re ready to go.  Sorry that this pic is out of sequence!   Anyway, the cage will help support the plant.  As it grows, I use old cut up pantyhose to tie the growing plant to the cage to help support the heavy branches as the fruits develop.  Pantyhose won’t cut into the plant and they are super stretchy to boot.  This cage was made from ‘all stock’ fencing, and they are really easy to make. 

Water your plant well, and keep the soil well watered (read: not dry, but not soggy) for a week or two while the roots develop.  Yes, you can kill a plant with kindness.  I probably water mine every other day until the plant starts showing new growth.  I have sandy, well draining soil, so honestly the possibility of me drowning my plants is slim to none, but if you have really clay-ey soil, you have to be a lot more cautious.  Then again, that’s really something to deal with BEFORE you plant!  I have to admit I am no expert on fertilizing and last year, I probably threw out some 13-13-13 around the plants a time or two as they were growing, but who knows?  I have had great success just using straight compost and not worrying about fertilizers.  This year, though I am using organic fish emulsion which STINKS, but so far it seems to have been working well on my baby tomatoes I am growing. 

Here’s to homegrown tomatoes!

Tater Time

Due to our 2 freakish snowfalls, the planting season for this year is about a month behind schedule.  This is fortunate, because I am always late as it is anyway.  So, instead of my regular Valentine’s Day tater planting, this year, I planted about 3 weeks late. Typical planting dates for taters in my zone is February 15th to March 1st.   The thing is, is that Irish ‘taters don’t like hot weather; they develop best on warm days and cool nights.  So, the concern with them (and many of the other veggie varieties that prefer this weather) is that there will not be enough days of this weather/daylight length for the veggie to produce before our notoriously hot weather sets in.  Once the hot weather sets in, the taters are done producing.  So, it will be interesting to see what kind of crop I get this year.  Last year, I harvested approximately 10-15 pounds of taters per 4’x8’ bed.  Not a huge number, but I assure you, it was more than enough to last us until fall! Just remember before planting anything to check your recommended planting dates for your area (!!!!!).    

This year, I planted differently than ’09.  In ’09, I dug 2 trenches in the beds, laid my little taters down in the trenches, about 10 inches apart and covered them with soil.  As the plants grew, I mounded soil, and then straw at the base of the growing green tops, because the tubers (read: taters) grow along the stem, as long as it is shielded from the sun.  So, this year, I made 2 long rows, dug a 4″ deep little hole, and put in the taters, and covered them up.  As the stems/leaves emerge I will cover them with either straw or mulch to protect the baby taters from the sun.  

Also note that I have rotated my beds..I am not planting the same veggies in the same bed that they were in the previous year.  You should ideally have a 3 year (or longer) rotation on your beds.  For example, let’s say in Bed #3, I will plant tomatoes this year.  I will not plant tomatoes in that bed again for at least 3 years.  This helps to prevent certain vegetable specific diseases/nematodes/etc from building up in the soil.  What happens is that your crop will steadily diminish in quality and quantity over time. 

 Here’s my very quick How-To.  Since I didn’t save many taters from last year, I bought ‘seed potatoes’ from the feed store.  These are small to medium potatoes from which your own plants will grow.  I cut the taters (well, Jason did it this year) into hen’s egg size pieces, making SURE that there is a good ‘eye’ on each piece. 

Here is a piece of a seed 'tater with a great eye. The eye will develop into the aboveground plant. The new tubers/taters will develop below.


Now you must let the pieces dry out for a few days.  We usually wait 2-3 days.  This allows the fresh cuts that you have made to heal.  After the cut sides are dry, now is the time to plant.  Since I’ve already described my beds, here they are:  

2 Rows of taters. I planted each piece about 3-4" deep and about 8 inches apart.


This year I planted Kennebec Whites and Yukon Golds.   Now it’s just up to Mother Nature!  Well, and I guess me, just a little bit.  I have to make sure I don’t let them get too terribly dry.   So, come about June, I hope to have lots of taters.  As you can tell, I do not agonize over how to plant my vegetables.  I DO research, of course, but I don’t agonize over all of the numbers, and facts and figures for the most part.  Some plants can be rather picky, and some plants you can pretty much throw on the ground, and they’ll grow.  As you garden and have your own successes and failures, you’ll get more comfortable about what is important and what really just isn’t.  

 Regarding seed potatoes, you can grow and keep your own.  I plan to keep some medium and small potatoes this summer just for this purpose, and I will plant a fall tater crop around the first of September.  I have read it is recommended to not cut these, but to plant them whole.

So Far Behind

Well, dear readers, I have taken many wonderful pictures just for you, and I am sooooo terribly behind in posting them.  I am going to post some for you now, with captions.  Please excuse the lack of cohesiveness in the subject matter!


Part of my herb garden leading to my deck. Fall of '09
Green tree frog hanging out on our deck
Small earth snake we found under a pallet. Yes, I am holding it. They eat small invertebrates, not people, so I felt pretty safe!
We began using pinecones as fire starter. Makes a neat pic, huh?
Pinecones work great to start fires...just make sure you have a small army of them and that they are fully opened.


That’s it for now…new posts coming up soon!

Caterpillars in the garden

 I have been reading an excellent book: Four Season Harvest by Eliot Coleman.  I guess I should say I have been reading it and re-reading it for about 3 months now and still have not progressed past Chapter 2.  This is for the simple fact that: A. I have children and cannot finish any task, period and  B. I get so inspired by the book that I run out and do something new in the garden and lose my place.  Well, FINALLY I have accomplished something…all by myself!  In the book, the author describes the French method of using ‘chenilles’ (French for ‘caterpillar’) in the garden.  Not actual caterpillars, mind you, but rather low, little ‘greenhouses’ which will greatly expand your growing and harvesting season to year-round.  So, the other day I decided that I was capable of creating such and I gathered all the necessary tools and implements.  For those of you who are unsure about building your own chenilles, let me relay some personal truths to you now. 


There are three things that I cannot do well.   

1.  Cook rice.  

2. Put icing on a cake and make it look like anything but a sheer disaster, and lastly;  

3. Hammer nails.  

I can do a great many things well, excluding those 3 things.  I had completely forgotten about number 3 until I went to hammer in some staples during my chenille-building experience.   

Bearing that in mind, let me give you a step by step instruction lesson.  

First, I took some 1/2″ PVC piping and I cut it to 100″ lengths.  This DID require the use of a power saw, and yes, I actually did this all alone.  How is it that I am deadly with a hammer and not a power tool, I do not know.  Anyway, because I am working off of my 4’x8′ raised beds, I guesstimated that 3 pieces should be sufficient for holding up my plastic.  I then dug 6 holes in my beds; 4 on the far corners and then 2 more in the middle of the bed, all in the interior of the bed. The holes need to be about a foot deep, so that when you set the pipes, they will be sturdy.

One arch is now in place

Then, I took a piece of the pre-cut PVC, stuck one end in a hole and CAREFULLY bent it over (yes, it WILL bend) and stuck the other end in the opposite hole.  This creates an arch, which will be the support for your plastic sheeting.   

Next, I back filled the holes, using the end of the handle for a ‘tamping stick’.  You want to pack down the soil around the pipes for stability reasons.  I backfilled about 3-4″ of soil at a time, tamping it down inbetween fills.  So, then I repeated this process with the middle arch and the arch at the opposing end.  Now, here is where my hammer comes into play.  I took some small staples (forgive me, I don’t know exactly what they are called but they are the kind you hammer in) and hammered a staple about 3/4 of the way into my raised bed sides right above where the PVC met the soil.  I had to leave an opening in the staple because I needed space to run some twine through it, therefore I did not hammer them in, or, attempt to hammer them in, all the way.  The twine secures the plastic sheeting against the arches.   

(Staple hammered into place where arches meet the soil)


I already had some plastic sheeting handy, though it was actually too small for completely covering my arches, I still chose to use it, since I didn’t really want to fork out more $ for another roll of it.  The plastic should be long enough to completely cover the arches, leaving several inches on the sides and a few feet on the ends. I use the clear plastic that is intended for painters to cover floors. I buy the thickest one they offer.  


 SO, now I had 3 arches, to the inside of my beds, and now it was time to cover with the plastic.  I took a staple gun (DANGER, Will Robinson!) and stapled the end of the sheet to the short end of the bed, and ran it over the arches to the other side, then stapled that to the opposing end.  NOW, it was time to run the string in a zigzag pattern, through the staples, which secured the plastic, holding it in place and bracing it against the wind.  So now I had something resembling a miniature covered wagon, sitting in my front yard.  Can anyone yell, “Zucchini, HO!” ?  

twine is run through the staples to hold down the plastic
Finished 'chenille'. As you can see, the plastic is way too short on the sides. It should be fully touching the ground.
Venting the chenille. When weather gets too warm, it will be necessary to keep the plastic pulled up so your plants don't cook!
To vent the chenille, I just pulled up the plastic in the center and secured with twine.

Ok, purpose of these ‘chenilles’.  They protect your seedlings/plants from frost and wind, which will totally zap your winter veggies.  They hold in the heat via the greenhouse effect to keep your little plants warm and toasty while it’s cold and crappy outside.  Thin leaved veggies (like lettuces, etc) do like cooler weather but don’t ‘do’ heavy frost settling on the thin leaves.  You’ll come out to a garden full of mush the morning after a frost.  Thicker veggies, like broccoli and cabbage, actually can handle light frost with no problem, but even still, I feel better protecting them from the elements.  The arches are low to the ground for this reason: as we all know, heat rises.  If you make the arches too tall, the trapped heat will not be in contact as much with the plants.   

The chenilles that the French use, according to this book, use thick wire hoops, and the wire is bent in an arch, and then a small circle where it meets the soil.  This is where my staples came into play.  The little circles are used to hold the twine in place.  Sorry if I am doing poorly at illustrating this with words…I am a visual person myself.  Anyway, the ends of the plastic are secured via a stake.  Soooooo, if you do not have raised beds, then this method will work for you.  I just happened to have the PVC handy.  My husband is the Mr. Haney of Maydelle.  Anyway, here’s the other cool thing about these chenilles.  When it is warm outside, since you don’t want your little plants to cook, you will need to ‘vent’ your little chenilles.  This is easily accomplished by pulling up the plastic in the center and securing it with a piece of twine.  This allows the trapped heat to escape.   

Thus far, I am loving my little ‘caterpillars’.  I do need to build some more, though I may use the wire method next.  Also, another way I have done these is to use a tomato cage made out of that 4″x4″ stock fencing, unhook it, flatten it somewhat and use these as your arches.  I did this with my cabbage and broccoli, and they did really well.  I was in a real recycling mode that day.   

Using an old tomato cage for support, it can be covered with plastic sheeting to protect against frost. These broccoli were planted October of 2009.
Broccoli which survived in spite of my care...February 2010

 Hope this inspires you all for this fall!!!  

Cabbage Patch Cat??? Mr. Bobo discusses the benefits of row covers while frolicking amongst my Jersey Wakefield cabbages.

Tomatoes in February…Let Spring 2010 begin!

This year, I ordered most of my plant seeds through a seed company called Baker Creek Heirlooms (rareseeds.com).  They are non-GMO certified (meaning that their seed is tested and is free of any genetically modified organisms), and offer a huge variety of heirloom seeds.  Why are heirlooms important?  Because they are literally seeds of the past, and they are not hybrids, which means that you will be able to collect and save seeds from the plants that you grow. Hybridized plants do not breed ‘true’.  This means that the seeds from a hybrid plant may or may not reflect the qualities of the parent plant.  Whereas, a heirloom plant will produce seeds which will produce exact genetic copies of the parent plant.  Moving on…

So, I got my seeds and headed on over to Wally world, where I picked up a 6 dollar Jiffy brand 72 cell greenhouse.  I have used them in the past, and I have been pleased with the results.  Plus, I mean…they’re only six dollars and the peat pellet refills are extremely cheap, too.  I put 2 seeds in each peat pellet, and I planted tomatoes, peppers, and parsley.  That was on February the 5th.  Today is the 15th, and most of the tomatoes have sprouted well and one pepper is just beginning to sprout. (thanks, Tayce!) So, I will let the little plants keep on growing until they are looking crowded and then I plan to move them to a larger pot (yogurt cup, maybe?), and let them get a little bigger before transplanting them.  This will be my first year ever to grow all of my own stock.  Exciting!!! 

Now, for planting dates.  If you are here in Texas, here is the recommendations I typically go by:  Spring Planting Dates  I am in Region III.  March 15th is considered our last frost date, to which you all who live here know that to not be the norm.  We usually have one last frost in April.  SO, if you decide to plant your warm weather crops, such as tomatoes or peppers come March 15th, you’d better bet your buttons you’ll have to provide some frost protection at least one more time, or your baby plants will suffer frost damage and possibly die.  For a freak cold snap, it is often enough to cover the plants with milk jugs with the bottoms cut off to completely cover the plants, or you can use buckets (I love my 5 gallon buckets).  This prevents the frost from settling on the delicate leaves.  During a late cold snap last year, I used milk jugs for my peppers and tomatoes, and while the tomatoes suffered minor damage, the peppers didn’t fare as well, which is why THIS year I won’t be planting them until mid April, but that’s just my personal choice.  I probably, in retrospect, should have also thrown an old blanket or some hay over the jugs, too.

If you are in East Texas, here is a great Month by Month calendar on what to do in the garden

For recommended varieties of veggies for East Texas, look here.  In fact, this website, set up by the Smith County Master Gardeners, is great.  Go to East texas home Gardening tab for lots of info.  Recommended varieties are the ‘tried and true’.  However, this year, I am adding a lot of different tomato varieties, so I am excited to see how they do!  There are test gardens all over the state who are continuously trying out different varieties to see which ones perform the best overall.