
This is a post about butchering chickens. Yes, it seems to be a totally irrelevant title, but I assure you, it IS about putting up your own birds. First, let’s get down to business about processing your very own meat birds.
Let me begin by saying meat chickens, more specifically, Cornish crosses or “Cornish X”, are nasty and just vile. Sorry, there’s no way around it. When humans developed an animal that does nothing (and I do mean nothing) but eat and poop, it just has to be pretty gross. They are the smelliest, messiest, and nippiest chickens out there. They will eat non-stop and poop non-stop. They will gulp water until their crops are huge and pendulous. If they do run out of food and you don’t have any, expect your hands to be pecked to a pulp. It ain’t pretty. People who have grown up working in broiler houses often do not have chickens, and I can clearly see why. If you’ve had no experience with chickens outside of broilers, you’d never know that they are really NOT nasty critters.
With that out of the way, they are definitely the most efficient way to get a bird from an egg to your freezer in the shortest amount of time possible. I call them “meat with a beak”, because that is ALL they are ‘good’ for. They don’t roam, they don’t lay eggs, they just sit and wait to be served their dinner. Because of this and their genetic makeup, they put on massive amounts of muscle quickly. So, if you want a table bird as fast as you can get it, a Cornish cross is the way to go.
We have always used Cornish cross and it has always made a fine carcass for processing. When we process, the birds are typically 4-5 pounds after butchering. So, it’s a pretty big bird. We usually do not get a table-ready bird in 6-8 weeks because we do not feed them non-stop. This time around, the birds were about 3.5 months old, which is ancient for a broiler. The problem was that we just really weren’t ready with our new processing equipment, and the birds weren’t getting enough food to top out quickly. In other words, it was our fault.
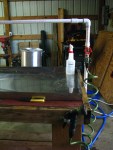
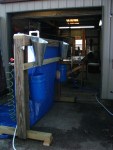
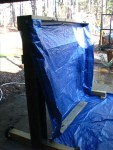
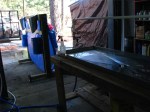
Anyhoo, we got about 1/3 of the flock done yesterday. We worked on butchering equipment for about 3 days, and I am showing it off via the photo gallery I have posted below. The boards were all ‘upcycled’ from decking boards and an old rabbit hutch that we had. The stainless steel ‘sink’ at the “Evisceration Station” is actually our ridiculously expensive chimney cap that blew off early last year, approximately 3 weeks after installation. Don’t get me started on that damned cap. I paid way too much, had it supposedly installed by ‘professionals’, and I will be damned if it didn’t blow off in a March gale, taking along with it some bricks which dented my BRAND NEW METAL ROOF and subsequently bashed in my vintage patio table, that now cannot hold a drink on it, lest it end up in your lap. SO DON’T GET ME STARTED ON CHIMNEY CAPS. But I had decided that since I had shelled out so much money on the stupid thing that there had to be a great use for it, and sure enough, with a hole drilled into the center, it makes an awesome chicken cleaning table. You know what they say: When life hands you lemons, throw some chicken guts on it, and it will be okay.
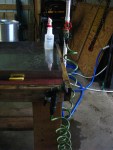
Each station has its own handheld sprayer with its own sprayer dock so that you are not stumbling over hoses or trying to balance your sprayer where you’re not going to get soaked with it. Trust me, been there, done that, and been soaked down WAY too many times to NOT have a reliable sprayer and a sturdy sprayer dock. All it is, is a little ‘c’ clamp so the sprayer handle hooks into it. On the Evisceration Station, the PVC bar across the top is drilled at the bottom with small holes. The red handle operates this flow, so you can turn it on independently of your sprayer. It helps to keep blood, feathers, etc. flowing towards the center drain, which empties into a 5 gallon bucket. Since the bucket fills up too quickly, we are going to put a screen at the bottom, add a PVC ‘drain tube’ out of the bottom side of the bucket. So, it will keep the funky stuff in and allow the water to escape.
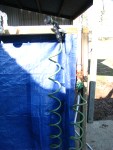
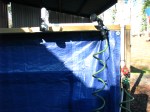
On the cone/plucking station, on one side we used 16″ tall flashing to create cones with the bottom openings just large enough for a chicken’s neck to fit into. Next time, we are going to also include some ‘c’ clamps at the top to hold the chickens’ feet in place as they can even still manage to squirm their legs enough to get down into the cones (they are probably a bit too wide). On the other side, there are 2 sets of chicken leg sized slots that were cut into the top beam. The legs fit in the slots perfectly (we used a live chicken and measured its legs), and the feet prevent the bird from slipping out. On one set of slots, we attached a showerhead above it so that we can turn it on to help rinse feathers downward when needed, into the tarp. The hand sprayer and showerhead are, again, plumbed independently so you can operate them separately.


The whole process went very well compared to our previous butchering day experiences, with one exception. We currently do not own a plucker. We have rented a Whizbang plucker in the past and there is just no other way to pluck once you have used one. We just didn’t have time to build one, though we have all of the parts needed except for the rubber fingers. However, by next g0-’round, you can be darn sure that we’ll have one because hand plucking sucks! Even though this time we got the water temperature perfect and the feathers literally slid out, it still takes too long.
For those of you unfamiliar with the process, here’s a rundown of how we do things.
1. Start heating your scalding water. We use a very large, lidded stockpot and an outdoor propane ‘turkey fryer’ burner. Water temp will need to be 145-150 degrees. I let it get a bit over 150, because when you remove the lid, the temp goes down, and it also gets cooler when you plunge a bird into it. Add about a teaspoon of Dawn to the water, to break the surface tension of the chicken feathers. Getting water to temp will take a long time. Always do this first!
2. Sanitize cutting instruments/tables/coolers with weak bleach solution. You can look up bleach to water ratios online…I can’t remember them exactly, but this time I believe we did a 1:12 solution. It must stay on for 15-20 minutes to disinfect surfaces, then you rinse it off with water.
3. When water temp is ready, your equipment has been disinfected, and you have a layer of ice in your cooler, you’re ready to begin. We ‘do’ 2 chickens at a time. Chicken is put into cone upside down and head is removed with a knife. Once bloodflow stops, it’s off to the scalding water.
4. Dunk the chicken several times to fully saturate the feathers, then hold it under with exception to the feet. Feet are nasty and I don’t like to think about getting chicken foot funk in my water. After about 8-10 seconds, I pull the bird up and try to pull out a flight feather. Once these slide out easily, it’s time to pluck.
5. Head over to the plucking area and remove all feathers. It isn’t difficult, but it is the most time consuming part of the job. I try to get all the pinfeathers (if any) as well. However, pinfeathers and the little ‘hair’ feathers come out very easily after the bird has been aged in the fridge, so if I miss some, it’s no big deal. I then rinse off the bird with a strong stream of water.
6. Now it’s time to eviscerate (remove the guts and ‘butt’). I remove the feet first, then the ‘wicking’ feather and oil gland above the tail. I also remove the very last joint on the wing. No one eats that anyway. Then I make a cut above the crop by the neck, and loosen the tendons around the crop and trachea. Personally, I remove the crop at this point below any food that may be present. The bird is on its back. Spin it around, and I make a cut just below the breast plate but well above the anus (yeah, you don’t want to go there). Then you reach in, scoop out ALL the organs and now the only thing still attached is the intestine to that yucky ol’ anus. CAREFULLY, you cut around that, throw it all in the ‘gut bucket’ and now all that’s left is the lungs. They are fixed to the ribs of the bird, so you have to reach back in and scoop them with your fingers. Now rinse the cavity well, and then the outside, and place the carcass in the cooler and stuff ice into the cavity to chill it quickly. Cover with ice, and move to the next bird.
7. After a chill in the ice for an hour or two, I take them out, and either put them in a giant baggie or stack them in a huge pan, cover with plastic wrap, and I leave them in our extra refrigerator for 2 days to ‘age’ the meat. This time in the fridge will make the meat super tender…at least in the case of young birds. If we’re talking about an old rooster or hen, you’d want to definitely boil it anyway, but if you have birds that are weeks or a few months old, after the stay in the refrigerator, you should have some very tender meat. I don’t ever skip this step.
8. After the 2 day aging period, it is then that I take them out, rinse them off again and cut them up into parts. It is very easy to slice them up at that point. Then it’s either time to have some chicken dinner or freeze them. I don’t like to leave fresh chicken in the fridge for more than 72 hours. You can put the parts in freezer bags, or double butcher paper. Some people also like vacuum bags.
So that’s chicken processing in a nutshell. If you want specifics on evisceration, you can watch the Joel Salatin (of Polyface Farms) video on YouTube. It’s very fast, so watch carefully. I don’t think I need to include photos of the actual butchering day because it’s all been done before, and done well.
So, just a few notes of DON’T’s for you:
DON’T forget to remove food and water the evening before you butcher your birds, unless you want to deal with poop and full crops. Gross.
DON’T forget to sharpen all your knives and have sharp kitchen scissors at the ready. Plainly speaking, dull knives make butchering absolute hell. Trust me. SHARP KNIVES, PEOPLE. SHARP KNIVES.
DON’T forget the ice! It takes a lot more than what you think!
And now on to the vegetarian part of this post….
After it was all said and done and we were hosing down all the grossness that goes along with butchering, I looked at Jason and said, “You know what’s great about vegetables? Vegetables don’t bleed.”
Of course, vegetables also don’t poop, they don’t have feathers or fur, and you don’t have to make sure that they have food and water every single day of the year. Over the past few years, both Jason and I have gotten to where we can hardly tolerate eating meat. Beef was the first to go. Sure, we still ate burgers and BBQ now and then, but we ‘paid for it’ every time with uber-exciting intestinal ‘troubles’. Then, it was pork. As much as I love a crispy piece of bacon, I’d ultimately end up with more, you guessed it, tummy ‘troubles’. It got so bad a few times that I vowed to eat nothing but hay, twigs, and sticks to move things along, if you know what I mean.
Over the past several weeks, we have really been doing very well on our veggie-heavy meals. Usually, there is no meat involved at all, and if there is, the kids will eat it. Well, last night I make chicken cacciatore with our fresh chicken. I made it chock full of organic bell peppers, onions, tomatoes and mushrooms…and chicken, of course. Well, we both found ourselves shoving the chicken to the side and munching down the veggies. I ate a bite of chicken and I wished I had spit it out. It just doesn’t even taste good to me anymore! It has nothing to do with the fact that I butchered it…this is about our 4th ‘batch’ of meat birds and I’ve never had an issue before. If I’m going to eat meat, I want to be the one to put it on my own plate. I just don’t want meat. I’m not going to vilify meat eaters even though I truly do believe that as a whole, our society eats WAY too much of it. Meat simply holds no appeal to me anymore. When I see meat, I can now see a dead piece of critter sitting on my plate. What’s more, it doesn’t taste good to me. What’s the point in that?
So, I guess I’m saying that my chicken butchering days are drawing to a close even after we have invested all this time and money in getting all of this done. Fortunately, the kids still enjoy chicken (for now), so we’ll do the rest of the birds, part them up, and use them in our meals. After that, the lovely equipment I just showed you may be shoved under a tarp and eventually sold.
Somewhere out in the chicken pen, I think I hear feather-muffled claps of joy.
