This October marked our 5th anniversary here at the farm. Every year, I try to improve my farm living skills and take away a lesson or two. Here is what I have to say for Year 5:
1. Self-sufficiency, as defined, is far too romanticized and a poor choice for the new ‘Back to the Land’ movement. Point being, you DON’T have to do it all! (hang with me here) – As defined by Wikipedia: “Self-sufficiency (also called self-containment) is the state of not requiring any aid, support, or interaction, for survival; it is therefore a type of personal or collective autonomy.”
Obviously, most of us are never, ever going to be truly self-sufficient. Let me first say that I completely agree with learning how to do things for yourself. How could it be a bad thing to know how to garden, bake your own break, mill your own grain, can food, bake, raise animals for the products they can provide us, etc.? It’s not! However, true self-sufficiency means that we would be doing all of these things without the help of others and also, we’d have to have the ability to make ALL of our own products, from food to clothing.
Now, when you first move onto some land, you get these kinds of ideas: I’M GOING TO GROW MY OWN FOOD! ALL OF IT! I’M GONNA GROW MY OWN VEGGIES, MEAT, DAIRY, ETC., ETC., ETC.! LET’S DO AQUAPONICS! LET’S DO HYDROPONICS! LET’S DO ANYTHING-PONICS! LET’S GROW ALL OUR OWN FOOD FOR OUR ANIMALS! LET’S GROW OUR OWN COTTON, GET A SPINNING WHEEL AND A LOOM, AND MAKE OUR OWN CLOTHING! I’M GONNA GET SOME ANGORA RABBITS AND USE THE FUR TO MAKE HATS AND MITTENS! i COULD MILL MY OWN LOGS! LET’S MAKE OUR OWN BIO-FUEL, AND, AND, AND, AND, and so on and so forth until you are doing so much that you don’t have a single spare moment in your day because you’re feeding, weeding, building, maintaining, and repairing things around the farm. Now, let’s address the part about being autonomous.
You do NOT have to do everything for yourself. Example: I refuse to grow yellow squash. Ain’t gonna do it, ain’t gonna pick squash bugs off the squash plants, not going to worry what I’m going to do with 200 pounds of yellow squash that my plants produced. What’s a farm girl to do? I buy my squash (very cheaply, may I add) from a little man down the road in a reasonable quantity. I do not have to deal with the squash bugs, the watering, the Tryingtosneaksquashintoeverymeal Problem. For two dollars, I do not have to deal with these things. By doing so, I am helping out a local farmer AND myself, because there is that much more time that I have to NOT be worrying about Yellow Squash Syndrome. While I do know HOW to grow and cultivate yellow squash, after a year of growing it I will not be doing that again. I think it’s knowing exactly HOW to do something, and not necessarily DOING it that is important. Of course, you do have to actually do something to truly know HOW to do it, but you don’t have to keep on DOING it, you see? I know HOW to knit and crochet because I have done it in the past, but I don’t DO it very often. I can ride a bike, but I don’t DO it.
The last problem I have with the ‘self-sufficiency’ by definition is that it leaves other people out of the picture. Unless you are living alone in a cabin in some remote part of the country, you need a good Farm Person Network. As I said above, I pay a retired man for my squash every year. My money helps him to offset his costs and hopefully give him a bit of farm income. In return, I get to spend some of my time doing other things. By other things, I mean not growing crookneck squash. By buying milk locally, I don’t have to buy, feed, and maintain a cow. By buying veggies I don’t really care to grow from a farmer’s market or buying locally produced meats, I am helping others.
There is a mental image that is projected from so many of the back-to-the-land magazines and books that seems to tell you that you should be doing everything they write an article about. Stop and take a deep breath. Don’t forget the worth of networking! You will find some of the most amazing people doing some fabulous things by networking in your farm community. If you don’t grow or raise a certain something, chances are someone in your local area does. Don’t get into the mindset that you must produce everything on your own farm. It’s okay to NOT be self-sufficient!
2. It’s okay to take a break from farming. After the drought of 2011, I was disgusted with gardening. I had watched many of my crops wither and die and frankly, it was more than depressing. If you have read my blog, you will also know that I have been flooded, pestered to death by pests, and rampaged by rabbits. Things like this wear on you. Every year, I record my gardening efforts in a garden journal. THIS year, I think I wrote in it maybe two times. I haven’t planted a true winter garden and it’s already November. I told my husband to lock me up if I mentioned raising broiler chickens and turkeys ever again. When it got really hot this summer (July-September), I refused to do any garden work.
I needed this break from my farming life. I don’t need every second of the day penciled in with farm chores. Because my garden had been planned out pretty well, it didn’t seem to mind that it was ignored for 2 whole months other than a very occasional weeding every few weeks. I don’t miss broiler chickens. I don’t feel guilty that I’m not whipping up a fresh batch of bread a few times a week.
Now that I’ve had some time to sit back, think, and streamline my farm ‘plan’, life is a lot better. I no longer am near tears when I look out into the front yard at all the work I haven’t done. Sometimes, you need to sit back, rethink the wheel for a bit, and make decisions to make your life less stressful. Letting some things go (even cool farm things!) is perfectly fine. Now that I’ve had a mental holiday, I find that I am ready more than ever to do little projects and experiments around the house.
But not too many.
3. The most precious thing I raise on the farm is my family. It’s easy to get so caught up in all the busyness of your farm life that you forget what is most important. At the end of the day, it’s your family that matters the most.
Monday began our first day of school for the year. Yes, I am one of those complete weirdos who chose to homeschool my kids. This is Homeschool Year Number One, Day Three. I will not bore you to death with my decision to homeschool, nor will I berate you if your children are in public school. Not one person on this planet is the same, and everyone learns differently. Now, let’s take that and wrap it up in a nice little box, adorn it with a pretty pink ribbon and tuck that away. Moving along, let us see how this week has gone for us, thus far:
Day One: I introduce myself to my children as “Mrs. Childress”. They fall into giggles and holler: “Mooooooooooooommmmmm, we know who you are!” Still, introductions are important, right? So they have to tell me their name, favorite food, color, and animal. The curriculum that I purchased (Sonlight) THANKFULLY is quite complete. Even so, I nervously thumb through the instructor’s guide to get through the day’s lesson plan. Things start off somewhat unorganized and I hope I am not losing my kids’ attention. After all, if you lose it for any more than 3 seconds, they are on to something else. (SQUIRREL!)
We go through my slightly dry presentation of archeology, and I am glad to get to our read-aloud book. There is 10 minutes that I don’t have to think too much; just read!
With that done, it was time for our geography lesson on the continents and the oceans. Speaking of which, has anyone ever heard of the ‘Southern Ocean’? Back in my day, we were taught that it was the ‘Antarctic Ocean’. Hmm. Well, the lesson came with a CD. As I put it on to play, my youngest hollers out, “I don’t want to hear BABY songs! This is so BOOOOOORRRRRIIIIIIINNNNNGGGG!” She covers her ears defiantly. After a Mother-Death-Stare and the promise of some swift punishment, she slowly removes her hands, but runs into a corner, sulking. Okay, well, I paid good money for this CD and by gum, we are all going to listen to it. What I did NOT foresee at the time was that the continent song would get burned into my mind and I would find myself humming the tune while washing dishes, and waking up for the next 2 days singing about Europe and Asia.
After our little show of defiance, I reeled in Miss MiffyPants and she had to read aloud to me. She was not at all pleased that the “people in the book had smiley faces, because she hates smiley faces” (it is a beginner’s bible) and also she thought that Adam’s choice of name for his partner was ‘dumb’ and that Eve should definitely been named “Lily” or “Daisy”. I still wonder why that are quite appropriate for a Border Collie would be acceptable for the first woman on earth, but what do I know? We finished up with a few pages on apes…also not Miss MiffyPant’s favorite animal, but we did decide that gibbons were tolerable.
Day 2: Today I felt more prepared since I had studied my instructor’s guide more the night before. I had pre-printed some coloring pages and decided that glitter and glue would make for a more interesting coloring project. The history lesson for today was on the Stone Age people. Youngest daughter’s eyes fly open when she realizes there are actually some fully nude/semi-nude drawings in our history book. Some people find offense to these drawings (and literally, the nipples are dots), but I think that seeing anything having to do with ‘celebrity news’ is far, far more harmful. It’s pretty hard to look trashy and uncouth as you are grinding grain in a concave stone, scraping a gazelle’s hide for leather, or making a coil clay pot. Anyway, once we got past the Stone Age Dotted Nipple chapter, I made an important discovery. Kids find things immensely interesting when you allow them to use Vis-A-Vis pens. These are the wet erase pens that we had that teachers would use on the overhead transparencies. Remember those? I had no idea how magical a wet erase pen could be. Suddenly, geography became FUN when not only could you WRITE ON THE MAP, but you could also DRAW PENGUINS ON ANTARCTICA AND SHARKS IN THE PACIFIC. I practically had to wrestle the pens out of their hands.
I decide to end the day with our craft, which is a coloring page about Hanukkah. It has a nice little picture of a few gifts, some golden coins (gilt), and a dreidel. Our lesson on People of the World was about the Jewish people. I am embarrassed to say that I know practically nothing about Jewish people, except that I went to school with one, and they play the dreidel game to win chocolate coins during Hanukkah, and I’m not even really sure I have that right. But that is what I told the kids and their eyes light up. They are nuts about chocolate coins. Then I tell them about the lighting of the menorah and that some Jewish children receive a small gift for the eight days of Hanukkah.
They both look at me with excited faces and announce: “Mom, we want to be Jewish!”
I don’t remember this being mentioned in my guide.
Day 3: After explaining that many Jews do not celebrate Christmas, Judaism took a back seat in the house, for now at least. Today was an odd day because we had some morning errands, so school began at noon. Things fell into place much easier today with some more pre-planning. I can see why my Mamaw, a Sunday school teacher of over 50 years, spent almost every afternoon alone in her bedroom, studying for the following Sunday’s lesson. Yes, it is clear to me now.
After 2.5 days of singing the Continent Song, I think it finally broke down Miss Miffy. She insists that we put on the CD. Rather than sing along, we all stood up and made an impromptu interpretive dance about the continents and oceans. Of course, for Antarctica, you must touch your toes, and when you sing of the oceans, you are required to perform swimming motions. After perfecting our new ‘routine’ and after I nearly vomit from spinning around far, far too often, it was time to leave geography behind for another day.
After reading about brown bears, our craft of the day was a coloring page of a grizzly bear, which the girls happily worked on for close to an hour. The last step was to coat the bears in glue and sprinkle on coffee grounds to make a ‘Mocha Bear’. I have to say, coffee grounds actually do make a pretty cool looking bear, though the bears ‘shed’ quite heavily.
So, so far, so good. I do not *DOOOOOO NOOOOOOOTTTTT* miss getting roused at 6am, throwing together a kinda-breakfast, kinda getting morning chores done, and running out the door, only to be tardy more often than I care to admit. And I know that the girls do not, either. I do not miss telling Miss Miffy 50 times to brush her teeth, wait in the car for her for 10 minutes, run back inside when she fails to show and yelling up the stairs to hurry up, running back to the car and pulling up to the school, only to realize that she forgot to brush her teeth anyway. I do not miss the insanity of the drop-off line at school, where everyone drives as though we are in a country with zero common sense, no rules or regulations, and people drop off their kids wearing furry Dale Earnhart pajama bottoms, no bra, and a freshly lit Virginia Slim hanging out of the corner of their mouths.
I guess I must be doing a pretty good job, even for a teacher of three days. Miss Miffy came running up to me after snack time with her eyes all aglitter with excitement.
“Mommy, when you die can I have that (geography) CD?”
“Yes. When I die, you may certainly have that CD.”
“YAY! Because it’s my favorite CD in the whole world!”
My poor chicken coop was looking pretty sad. Not that it has ever been a jewel. When we moved here, it was a 3 sided ‘loafing’ shed on its last legs. We shored it up and enclosed the front, added a sliding door to the run on the side, and a window for ventilation. It may be coon-proof, but it certainly isn’t snake-proof. It’s not the best looking thing you’ve ever seen, but it worked for us for several years until we built a secondary coop. The front, as you can see, has clear corrugated material on the front to allow light in. The egg sign was one that I designed and painted when I was selling my extra eggs at a local farmer’s market. After reading several blogs and posts about painting structures and pretty coops, yesterday I grabbed some leftover red barn paint and some white trim paint.
In about 2 hours, here are the results below! Cost to me was pretty much nada, since I already had a lot of leftover paint on the shelf. Not bad, ya think?
Below you can see the little sliding door. I painted a little ‘X’ on the door to match the front door somewhat. I really like it. You can see little Dolly Banty and our Old English Gamebird/Silkie cross checking it out.
This is year #5 of allowing what was once a tiny stub of wisteria to grow. This has been its most productive year to date. I keep it trimmed, otherwise, it would take over the arbor, and probably my entire house! Happy spring to you all!
On February 10th, we had a pretty catastrophic thing happen at the farm. Over the course of approximately four hours, we received 3.40 inches of rain. It was a deluge…absolutely torrential. Admittedly, I did sleep through the majority of it with the exception of about 4 seconds at 4 in the morning when I peeked through my blinds to see rain falling so heavily that the entire world appeared white.
When I got up that Sunday morning, the sun was shining, the birds were singing, the grass was green….and my front yard had washed downhill. The front yard that we have slaved on ever since the day we moved here. For any new readers, you may want to take a look back at my posts about the Bermuda grass situation. In a nutshell, the yard which we had decorated beautifully with a fence, gates, landscape timbers and 15 raised beds was razed flat to the ground because it was infected, YES INFECTED, with Bermuda grass. After four years of battling the grass, we finally had enough and tore it all out this past September. For many weeks, we sifted soil by hand to remove any remaining grass and we added countless bags of mulch anywhere that we didn’t want our plants to grow. I have boiled down the process to a few sentences, but it took many months of work to get where we are today. Or at least where we were Saturday, because on Sunday about a quarter of my mulch was gone and my newly seeded wildflower bed was all but washed away.
As I was looking at the damage done, my eyes fell on my arugula/Asian greens seedlings.
Wait.
Where the hell are my seedlings? I frantically bent down, and performing some immediate Front Yard CSI investigative techniques, I discovered that the greens had been mowed down by a wild rabbit.
Great, so not only did my garden get hit by a flash flood, but now the seedlings that I had been waiting for since January got completely assaulted by a buck-toothed, garden-destroying furball. It was just too much. I should also add that I was in the murky depths of a hormonal fog. So I was on the verge of tears standing in my garden, trying to take in the destruction that lay before me, trying to decide whether to give up, cry, or find some stray dynamite and do the entire thing in.
In the end, I got over it. Jason vowed never to touch it again, and so far, he hasn’t. He would love nothing more than covering the entire thing in about 10 inches of mulch and saying to hell with it. Myself, on the other hand, being the type who is either absolutely insane or loves self-punishment, decided to keep forging ahead and take a clue from Mother Nature. A good lesson here is to never work against Her. Bad idea. This time, I noted where the run-off had been the worst and just worked around it. Why would I plant or put mulch there if they’re just going to get swept away? Now I officially have my very own “Horseradish Island”…my way of working with Nature by allowing water to run around my horseradish bed in a natural, teardrop-shaped form rather than trying to keep a 4×10′ rectangle. I also added some rocks to the upper sides of some of the beds to prevent any further erosion.
I ended up not crying, and not setting off any explosives. As for the rabbit, two weeks after the flood, Jason called to tell me that a certain little furry enemy of ours was lying dead in the ditch beside our house. I like to think of it as Mother Nature’s peace offering.
This is a post about butchering chickens. Yes, it seems to be a totally irrelevant title, but I assure you, it IS about putting up your own birds. First, let’s get down to business about processing your very own meat birds.
Let me begin by saying meat chickens, more specifically, Cornish crosses or “Cornish X”, are nasty and just vile. Sorry, there’s no way around it. When humans developed an animal that does nothing (and I do mean nothing) but eat and poop, it just has to be pretty gross. They are the smelliest, messiest, and nippiest chickens out there. They will eat non-stop and poop non-stop. They will gulp water until their crops are huge and pendulous. If they do run out of food and you don’t have any, expect your hands to be pecked to a pulp. It ain’t pretty. People who have grown up working in broiler houses often do not have chickens, and I can clearly see why. If you’ve had no experience with chickens outside of broilers, you’d never know that they are really NOT nasty critters.
With that out of the way, they are definitely the most efficient way to get a bird from an egg to your freezer in the shortest amount of time possible. I call them “meat with a beak”, because that is ALL they are ‘good’ for. They don’t roam, they don’t lay eggs, they just sit and wait to be served their dinner. Because of this and their genetic makeup, they put on massive amounts of muscle quickly. So, if you want a table bird as fast as you can get it, a Cornish cross is the way to go.
We have always used Cornish cross and it has always made a fine carcass for processing. When we process, the birds are typically 4-5 pounds after butchering. So, it’s a pretty big bird. We usually do not get a table-ready bird in 6-8 weeks because we do not feed them non-stop. This time around, the birds were about 3.5 months old, which is ancient for a broiler. The problem was that we just really weren’t ready with our new processing equipment, and the birds weren’t getting enough food to top out quickly. In other words, it was our fault.
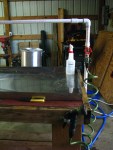
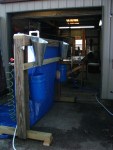
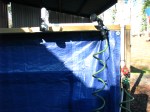
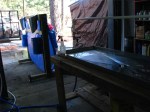
Anyhoo, we got about 1/3 of the flock done yesterday. We worked on butchering equipment for about 3 days, and I am showing it off via the photo gallery I have posted below. The boards were all ‘upcycled’ from decking boards and an old rabbit hutch that we had. The stainless steel ‘sink’ at the “Evisceration Station” is actually our ridiculously expensive chimney cap that blew off early last year, approximately 3 weeks after installation. Don’t get me started on that damned cap. I paid way too much, had it supposedly installed by ‘professionals’, and I will be damned if it didn’t blow off in a March gale, taking along with it some bricks which dented my BRAND NEW METAL ROOF and subsequently bashed in my vintage patio table, that now cannot hold a drink on it, lest it end up in your lap. SO DON’T GET ME STARTED ON CHIMNEY CAPS. But I had decided that since I had shelled out so much money on the stupid thing that there had to be a great use for it, and sure enough, with a hole drilled into the center, it makes an awesome chicken cleaning table. You know what they say: When life hands you lemons, throw some chicken guts on it, and it will be okay.
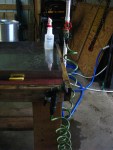
Each station has its own handheld sprayer with its own sprayer dock so that you are not stumbling over hoses or trying to balance your sprayer where you’re not going to get soaked with it. Trust me, been there, done that, and been soaked down WAY too many times to NOT have a reliable sprayer and a sturdy sprayer dock. All it is, is a little ‘c’ clamp so the sprayer handle hooks into it. On the Evisceration Station, the PVC bar across the top is drilled at the bottom with small holes. The red handle operates this flow, so you can turn it on independently of your sprayer. It helps to keep blood, feathers, etc. flowing towards the center drain, which empties into a 5 gallon bucket. Since the bucket fills up too quickly, we are going to put a screen at the bottom, add a PVC ‘drain tube’ out of the bottom side of the bucket. So, it will keep the funky stuff in and allow the water to escape.
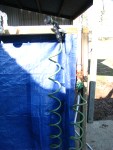
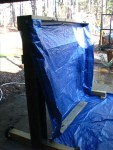
On the cone/plucking station, on one side we used 16″ tall flashing to create cones with the bottom openings just large enough for a chicken’s neck to fit into. Next time, we are going to also include some ‘c’ clamps at the top to hold the chickens’ feet in place as they can even still manage to squirm their legs enough to get down into the cones (they are probably a bit too wide). On the other side, there are 2 sets of chicken leg sized slots that were cut into the top beam. The legs fit in the slots perfectly (we used a live chicken and measured its legs), and the feet prevent the bird from slipping out. On one set of slots, we attached a showerhead above it so that we can turn it on to help rinse feathers downward when needed, into the tarp. The hand sprayer and showerhead are, again, plumbed independently so you can operate them separately.
Notice place to hang sprayer…
The Evisceration Station
Plucking station sprayer and showerhead
“Killing Cones’ side
Showerhead and hand sprayer at Pluck Station
Plucking Station
My eviscerating knife and hand sprayer
Evisceration Station #2
“Killing cones” and edge of “Evisceration Station”
The whole process went very well compared to our previous butchering day experiences, with one exception. We currently do not own a plucker. We have rented a Whizbang plucker in the past and there is just no other way to pluck once you have used one. We just didn’t have time to build one, though we have all of the parts needed except for the rubber fingers. However, by next g0-’round, you can be darn sure that we’ll have one because hand plucking sucks! Even though this time we got the water temperature perfect and the feathers literally slid out, it still takes too long.
For those of you unfamiliar with the process, here’s a rundown of how we do things.
1. Start heating your scalding water. We use a very large, lidded stockpot and an outdoor propane ‘turkey fryer’ burner. Water temp will need to be 145-150 degrees. I let it get a bit over 150, because when you remove the lid, the temp goes down, and it also gets cooler when you plunge a bird into it. Add about a teaspoon of Dawn to the water, to break the surface tension of the chicken feathers. Getting water to temp will take a long time. Always do this first!
2. Sanitize cutting instruments/tables/coolers with weak bleach solution. You can look up bleach to water ratios online…I can’t remember them exactly, but this time I believe we did a 1:12 solution. It must stay on for 15-20 minutes to disinfect surfaces, then you rinse it off with water.
3. When water temp is ready, your equipment has been disinfected, and you have a layer of ice in your cooler, you’re ready to begin. We ‘do’ 2 chickens at a time. Chicken is put into cone upside down and head is removed with a knife. Once bloodflow stops, it’s off to the scalding water.
4. Dunk the chicken several times to fully saturate the feathers, then hold it under with exception to the feet. Feet are nasty and I don’t like to think about getting chicken foot funk in my water. After about 8-10 seconds, I pull the bird up and try to pull out a flight feather. Once these slide out easily, it’s time to pluck.
5. Head over to the plucking area and remove all feathers. It isn’t difficult, but it is the most time consuming part of the job. I try to get all the pinfeathers (if any) as well. However, pinfeathers and the little ‘hair’ feathers come out very easily after the bird has been aged in the fridge, so if I miss some, it’s no big deal. I then rinse off the bird with a strong stream of water.
6. Now it’s time to eviscerate (remove the guts and ‘butt’). I remove the feet first, then the ‘wicking’ feather and oil gland above the tail. I also remove the very last joint on the wing. No one eats that anyway. Then I make a cut above the crop by the neck, and loosen the tendons around the crop and trachea. Personally, I remove the crop at this point below any food that may be present. The bird is on its back. Spin it around, and I make a cut just below the breast plate but well above the anus (yeah, you don’t want to go there). Then you reach in, scoop out ALL the organs and now the only thing still attached is the intestine to that yucky ol’ anus. CAREFULLY, you cut around that, throw it all in the ‘gut bucket’ and now all that’s left is the lungs. They are fixed to the ribs of the bird, so you have to reach back in and scoop them with your fingers. Now rinse the cavity well, and then the outside, and place the carcass in the cooler and stuff ice into the cavity to chill it quickly. Cover with ice, and move to the next bird.
7. After a chill in the ice for an hour or two, I take them out, and either put them in a giant baggie or stack them in a huge pan, cover with plastic wrap, and I leave them in our extra refrigerator for 2 days to ‘age’ the meat. This time in the fridge will make the meat super tender…at least in the case of young birds. If we’re talking about an old rooster or hen, you’d want to definitely boil it anyway, but if you have birds that are weeks or a few months old, after the stay in the refrigerator, you should have some very tender meat. I don’t ever skip this step.
8. After the 2 day aging period, it is then that I take them out, rinse them off again and cut them up into parts. It is very easy to slice them up at that point. Then it’s either time to have some chicken dinner or freeze them. I don’t like to leave fresh chicken in the fridge for more than 72 hours. You can put the parts in freezer bags, or double butcher paper. Some people also like vacuum bags.
So that’s chicken processing in a nutshell. If you want specifics on evisceration, you can watch the Joel Salatin (of Polyface Farms) video on YouTube. It’s very fast, so watch carefully. I don’t think I need to include photos of the actual butchering day because it’s all been done before, and done well.
So, just a few notes of DON’T’s for you:
DON’T forget to remove food and water the evening before you butcher your birds, unless you want to deal with poop and full crops. Gross.
DON’T forget to sharpen all your knives and have sharp kitchen scissors at the ready. Plainly speaking, dull knives make butchering absolute hell. Trust me. SHARP KNIVES, PEOPLE. SHARP KNIVES.
DON’T forget the ice! It takes a lot more than what you think!
And now on to the vegetarian part of this post….
After it was all said and done and we were hosing down all the grossness that goes along with butchering, I looked at Jason and said, “You know what’s great about vegetables? Vegetables don’t bleed.”
Of course, vegetables also don’t poop, they don’t have feathers or fur, and you don’t have to make sure that they have food and water every single day of the year. Over the past few years, both Jason and I have gotten to where we can hardly tolerate eating meat. Beef was the first to go. Sure, we still ate burgers and BBQ now and then, but we ‘paid for it’ every time with uber-exciting intestinal ‘troubles’. Then, it was pork. As much as I love a crispy piece of bacon, I’d ultimately end up with more, you guessed it, tummy ‘troubles’. It got so bad a few times that I vowed to eat nothing but hay, twigs, and sticks to move things along, if you know what I mean.
Over the past several weeks, we have really been doing very well on our veggie-heavy meals. Usually, there is no meat involved at all, and if there is, the kids will eat it. Well, last night I make chicken cacciatore with our fresh chicken. I made it chock full of organic bell peppers, onions, tomatoes and mushrooms…and chicken, of course. Well, we both found ourselves shoving the chicken to the side and munching down the veggies. I ate a bite of chicken and I wished I had spit it out. It just doesn’t even taste good to me anymore! It has nothing to do with the fact that I butchered it…this is about our 4th ‘batch’ of meat birds and I’ve never had an issue before. If I’m going to eat meat, I want to be the one to put it on my own plate. I just don’t want meat. I’m not going to vilify meat eaters even though I truly do believe that as a whole, our society eats WAY too much of it. Meat simply holds no appeal to me anymore. When I see meat, I can now see a dead piece of critter sitting on my plate. What’s more, it doesn’t taste good to me. What’s the point in that?
So, I guess I’m saying that my chicken butchering days are drawing to a close even after we have invested all this time and money in getting all of this done. Fortunately, the kids still enjoy chicken (for now), so we’ll do the rest of the birds, part them up, and use them in our meals. After that, the lovely equipment I just showed you may be shoved under a tarp and eventually sold.
Somewhere out in the chicken pen, I think I hear feather-muffled claps of joy.
So far, I’ve been doing all four, which is pretty amazing for me. Of course, we’re only 9 days into the year.
To help me along, I bought some cookbooks for inspiration, because most of my cookbooks are the typical, everyday Southern American diet which consists of 5 major food groups:
1. Bacon
2. Cheese
3. Cream cheese
4. Butter
5. Cream-of-whatever soup
Last week, my new cookbooks arrived. First up is, Vegetarian Cooking for Everyone by Deborah Madison. I haven’t made very many recipes out of it yet, but it is like a ‘Joy of Cooking’ for vegetarians. I did made some aioli (garlic mayonnaise) and served it with an avocado club sandwich and it was PHENOMENAL. I could have downed about 4 of them. I actually got to use my mortar and pestle that has been slowly developing a nice dust layer on my shelf. I had to look up a video on how to use the thing as I was completely clueless. Luckily, all the garlic DID remain in the little bowl without flying out everywhere.
Next up is Weelicious by Catherine McCord. This cookbook is geared toward families with young children. We have been using this cookbook several times a day already. While I think some of the recipes do need slight tweaking, so far, the majority of them have been hits with the kids. Last night I made the Graham Crackers, and we totally scarfed ’em. Fortunately, they made a huge batch when you roll them out to 1/8″ (and NOT the 1/4″ recommended), so there are plenty left. I like Weelicious because it is mostly low sugar recipes or uses alternative sweeteners like agave nectar and honey. You can get many of the recipes for free right on her website, too. I made the Beet and White Bean hummus a few days back. I have never eaten a beet in my life and I have to say I was very surprised. I figured it would taste like dirt (that’s my own weird thought on beets), but fresh beets are very sweet and have a consistency of a carrot. Not to mention that they are my absolute favorite color: fuschia. Be forewarned, though, because they will turn everything fuschia that they touch. Anyway, it makes this radical hot pink hummus. When Jason came home, I whipped out this neon dip with some baby carrots, celery sticks, and bell pepper sticks, and he looked at it like it had a dead rat in the center of the bowl. Especially after I told him it contained beets.
Poor Jason. His Granny made him eat canned beets as he grew up and she was a Clean Plate enforcer. So, Jason HATED beets. Or so he thought until he tried my dip! Actually, it just tastes like a good bean dip and nothing more.
In addition to adding more veggies to our diet, I also bought some different grains and rice varieties. I made a wild rice soup that was just out of this world. When I served it at dinner, my youngest daughter ran upstairs, grabbed her diary, and made an entry, as you can see above. She then brought it back down to be sure that I saw it. In addition to “I hate soop, Mom” you can clearly see the arrow breaking her little heart and ripping it in two. Because that’s exactly what I was trying to do by making a good, healthy meal, you see. As I was slaving in the kitchen for a few hours to prepare this soup, I was thinking to myself, “Now what could I prepare to make my child absolutely want to vomit?” Unfortunately, or perhaps fortunately, neither child would come within 10 feet of the soup so Jason and I got to eat it all. Oh well. We can’t win ’em all.
Anyway, I can’t say that I miss Facebook. I have broken up with Facebook and moved on to Pinterest, which I find much more inspirational and I also do not check it constantly like I did with FB. Although some pins are just nauseating (gold staples, anyone?), you can at least search what you like and the comments aren’t irritating.
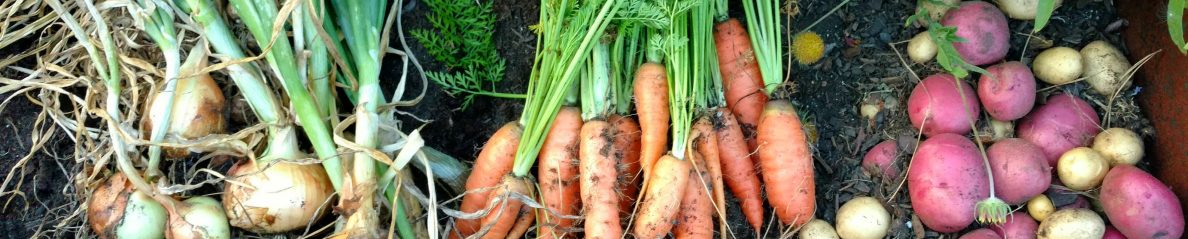
As far as the garden goes, we planted our onions about 4 days ago. I’m glad we did, because this week has brought flooding rains that will be great for getting them established, providing that a river doesn’t decided to run through the front yard and carry my baby onions to the bottom of the hill. I tried a few new varieties this year, including Texas Legend, Super Star, and Red Candy Apple. We also planted our old favorite, 1015s. Plus THIS YEAR I planted the things in good, deep compost which I did not do last year, and ended up with the saddest, sorriest lot of onions I ever planted. Now is the time to start some cole crops, and I’m also getting my taters ready to plant by letting them develop some nice eyes before planting them. I am also going to try some new things in the garden including bok choy, turnips, and winter squashes.
Today was another one of those sad farm days. One of those days when you’re forced to say ‘goodbye’ before you really want to. Our favorite hen, Dovie, had to be euthanized today. She was born in March of 2009 in a hatchery and she was special ordered from a man who never went to collect her and her sister at a feed store. So, she and the sister came to live with us. Both were Old English Game bantams, in a color called Lemon Blue splash. We had her sister until last year, when she disappeared during egg-laying season. Dovie was always the sweeter of the two, and Jason actually had her trained to fly on his shoulder so he could feed her corn out of his hand.
You could do anything with Dovie…hold her practically upside down if you wanted to…and she didn’t care. There was only 2 times a year you couldn’t touch her, and that was when she laid her eggs. Dovie would go ‘missing’ for weeks at a time only to suddenly pop out behind a bush or patch of grass in 3 weeks with a full brood of baby chicks. And honey, you’d better not even think about coming near those chicks. Talk about a Jekyll and Hyde personality! My sweet little hen turned into a feathered, rabid attack dog that would take you on, no matter the size. She transformed into a huge, furious, puffy ball of grey feathers and increased her size by at least double. Then she would run and fly at you, dive bombing your feet and legs and screaming like a banshee the entire time. Other than those two times a year, she was her normal self.
What happened was that she prolapsed, which essentially means that her insides were now outside. More specifically, part of her intestines were protruding from her cloaca/vent (and, in layman’s terms….her butt. Not that chickens have an official ‘butt’, but anyway). Causes of this vary, but since she had been laying eggs, that is the most likely culprit. I already knew from past experience that this wasn’t a good thing, especially in an egg-laying bird. Yes, there are some treatments available, both surgical and non-surgical. However, the fact is, she is a chicken that is going to lay twice a year. This puts enormous strain on the area and can lead to another prolapse, even if repaired surgically. Plus, her prolapse was significant, especially for her size.
I called our veterinarian who told me the news that I knew I’d already hear. The outcome usually isn’t a good one; it’s a guarded prognosis. BUT, there was something I could try. He told me to pour table sugar on the protrusion. Yes, regular ol’ sugar. It pulls the fluid from the swollen tissues and allows them to retract to where you can reinsert the tissue to where it goes.
So, if you’re wondering:
Yes, I sugared a chicken’s butt
and
yes, I stuck my pinkie in a chicken’s butt.
With gloves, you should know.
So now, if I am on some kind of weird truth or dare game show where the host asks, “Have you ever poured sugar on a chicken’s anus*?” I can proudly answer, “Yes. Yes, I sure have.” Hopefully, that will win me some major points…perhaps even a chance at a new kitchen. Anyway….
Yes, the sugar does work! It takes time; maybe 30 minutes or so, and you have to keep on reapplying. It worked for a while, until she tried to go poop, and then it came back out again. In my mother’s words, she was just “wo’ out”. Her lady bits had too much abuse over the years.
I made the decision to euthanize. Were she not a bird that laid eggs a few times a year, the decision may have been different.
Jason and I both felt that it would be the best way to allow the vet to euthanize her. The idea of ending her life with a hatchet was just too morbid and disrespectful, we thought. So that’s what we did.
I am sad to see her go, but I am happy that I have both her daughter and her grandaughter, who has the exact same coloring that she had.
In the end, I am glad of two things.
1. I had several years of companionship with Dovie,
2. That humans don’t have to use the sugar remedy for hemmorhoids. So, very…very glad of that.
*I know, ‘anus’ is not the correct term, but let’s face it, it’s a funny word.